Calenco user interface
User guide
1. Take a look
1.1. Structured writing
Benefits of structured writing
Segregate content (information) from format.
The writer is focused on added value, technical content and its structure - without loosing time on layout.
In a world where information tends to be spread though multiple channels (web, mobile, tablets, augmented reality...), content can be presented under different aspects, without having to work on the content itself again.
To define some contents written as reusable.
Following the principle of single source, a piece of information exists at one place and it can be consumed several times. If this piece of information is updated, it will be up to date in all documents using it, providing first class reliability.
- Filter items to customize the documentation presented to the end user based on the context of use of product options, user level, etc.
See the demonstration of the Separation of content and form principle:
1.2. Modularity and reuse
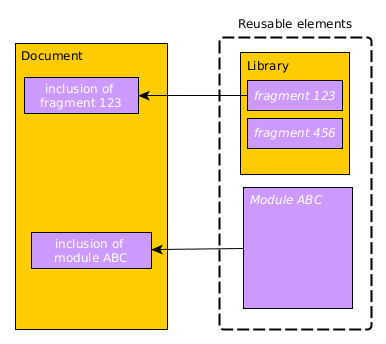
Calenco allows you to reuse more or less bulky pieces of information.
- Modules are reusable documents;
- Fragments are elements organized in document libraries;
- An inclusion is about reusing a fragment or a module in another document.
Check out the video of the principle Modularity and reuse:
1.3. Naming contents
In systems based on directories and files, the file name is very important: it allows you to find it, to know what version it is, sometimes even who wrote the document (for example). Changing the file name sometimes makes it difficult to track.
“Manual Sorting Machine VX72 V2.6 JFK.docx” for a Word file stored in a DMS
We have designed a content naming system that ensures data consistency with great flexibility.
The same content (document, text module or image) has two “names”:
The two names of contents in Calenco
- The label (for users)
The label appears in the content list. It is initialized with the title of the content (for text content) or with the name of the file (for images).
This label can be modified, without consequences other than the comfort of users.
- The name (for Calenco)
This “technical” name is generally not meaningful to the user and is not displayed by default.
This identifier is unique (in a language space) and is used to reuse content and ensure its traceability.
![[Note]](cco-note.svg) | Show filename |
|---|---|
A check box allows you to display the name of the file next to its label. |
2. To create
2.1. To create a document
2.1.1. To create content
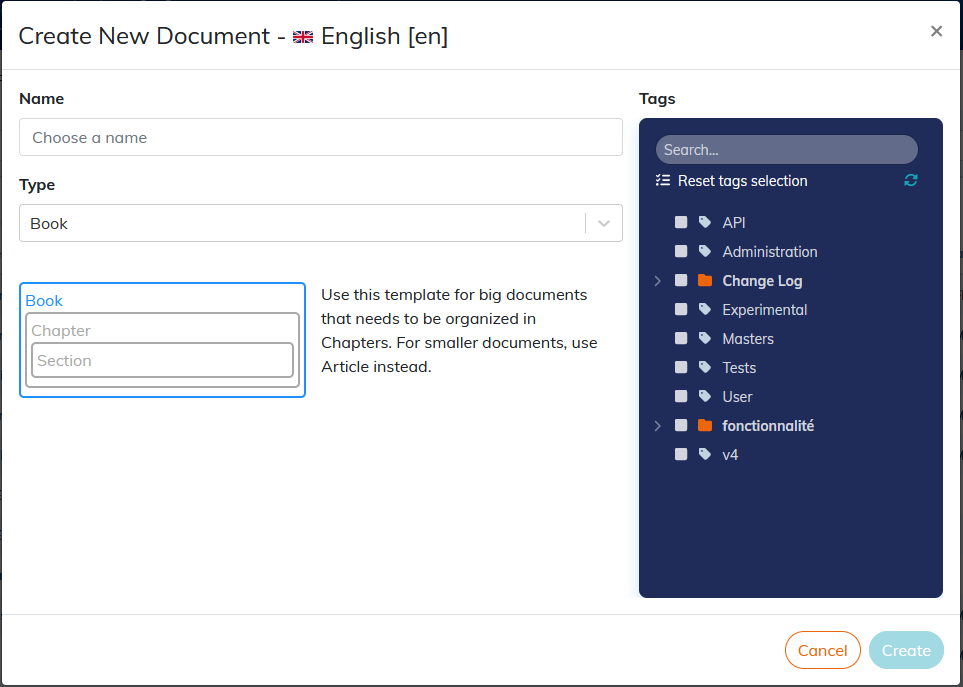
Click on
 Create.
Set a title to the content.
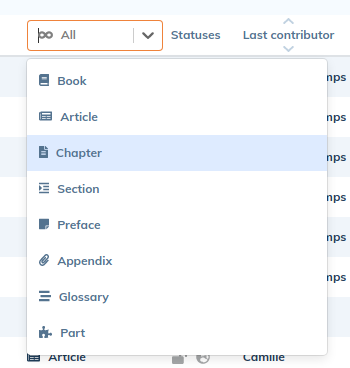
Choose the type of content:
- A
bookis a long document, with a complete structure. It is made ofparts andchapters. An
articleis made of sections of different levels.Not being composed of
chapters, the article is preferred to create shorter documents than books.- Reusable contents are elements (
preface,part,chapter,section,appendix,glossary,bibliography) that can be included inbooksorarticles. - A customized template (see Create a content template).
- A
Associate a label(s) with the content created, if necessary.
Click on : the content editor opens the created content in a new tab.
![[Caution]](cco-caution.svg)
Popup Some browsers (Mozilla Firefox) block pop-up windows: this can prevent the web editor from opening.
Make sure to add the url of the web editor to the list of allowed sites in your browser settings.
The new content appears at the top of the list.
2.1.2. To import content
There are two methods for importing content:
- Click
 Import .
 - Select content from your PC. Drag and drop it into the Calenco interface.
![[Important]](cco-important.svg) | Import tagging |
|---|---|
When importing content, all the previously selected labels are associated with the imported elements. |
| |
Details of the last ZIP import. In the case of importing .zip archives, the details of the import can be consulted via the button in the Import content window or in the status notification at the bottom right of the screen. |
Depending on the extension of the selected file, Calenco will propose you some alternatives:
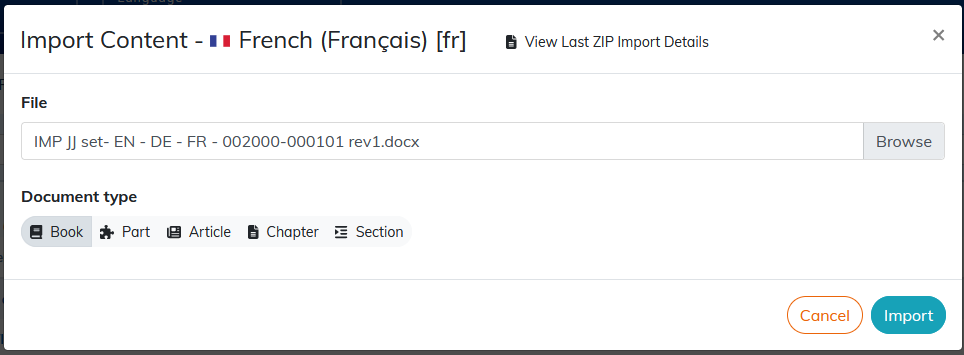
2.1.2.1. To import a .docx file
| |
You can choose the type of document to create. |
| |
Style elements. Before importing, check that the layout elements (table of contents, header and footer, cover page) are not imported. It is recommended to remove them from the .docx to import beforehand. Check that the .docx has a style (level 1 title etc.). After importing, the content is structured according to the levels of titles defined in the original document. |
| |
It is recommended to delete images from large files to speed up the import, and import them separately (see To import an image). |
2.1.2.2. To import an .xlsx file
To import an .xlsx file, follow the same procedure as for importing a .docx file:
| |
Tabs and date format. Each sheet of the workbook imported in Excel format ( Dates must be formatted with numeric format with slash only to be correctly interpreted. |
![[Warning]](cco-warning.svg) | |
Cell verification. Watch out for “stray” cells which could lead to the creation of a large number of empty cells. Use the function to check the presence of all the necessary cells (seeTo insert a table). |
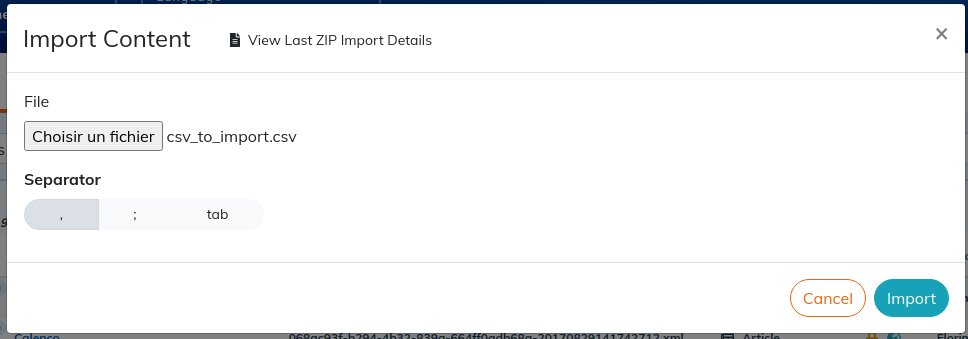
2.1.2.3. To import a .csv file
Once you choose the data separator, Calenco transforms the data into a table in a section.
2.1.2.4. To import an .html file
HTML files and images must be contained in a .zip archive, without any directories.
| |
Don't forget to tick the |
2.1.2.5. Import a .pdf file
There are several ways to work with PDF files, depending on the desired purpose:
Different PDF import methods
- Display an image of the PDF pages in an HTML (or similar) publication
In this case, use the function
Import available from the list of documents, or Drag & Drop from the PC to the interface. This will:- create a PNG image for each page of the import document, at the resolution chosen during the import. Images are now used as described in To insert an image;
- create a reusable content module containing all of these images.
- Display an image of PDF pages in a PDF publication
If you want to get the best possible quality from your PDF publication, it is best to use the original PDF pages. In this case, use the import function from the list of images to import the PDF without transformation.
You can then use this file via the editor with the function To insert a page of a PDF file .
- Modify the content of the PDF to bring it to life
Recent versions of some office suites allow you to import a PDF file and save it in DOCX format - which can then be imported into Calenco.
![[Tip]](cco-tip.svg)
Document structure. The entire structure of the document will undoubtedly be lost in this case, it will be necessary in particular to recreate the title structure thanks to the functionalities of the content editor.
2.1.2.6. To import style sheets
When the Calenco team modifies your style sheets, we provide you with a .zip archive.
Import this file as is, regardless of the selected language.
2.1.3. To modify documents
To edit a content, click on its label.
Editor opens in a new tab.
| Tabs |
|---|---|
Each content is edited in a new tab of your browser. |
You can then work on the document Content editor.
2.1.4. Create a content template
Procedure 1. From scratch
Choose in the drop-down list of types.
Click on .
Then proceed as for To create content.
Procedure 2. From an existing content
Click on → aside the document to duplicate as template.
The created template is no longer linked to the original document.
Optionally choose a basic publication to associate with the template.
The publication associated to the template will be created and associated to documents created from this template.
This publication can be edited or created after creating the template.
The template can be edited in the editor.
The template is visible in the list.
Content templates can be sent for translation like any other content (see To ask for translation).
2.2. To use images
2.2.1. To import an image
Click on to import an image.
| Import tagging |
|---|---|
When importing content, all the selected tags are associated with the imported elements. |
| Where to import ? |
|---|---|
An image with text should be imported in the corresponding language, to support any translations. An image without text or that is common to all translations should be imported in the language. |
| |||||||||
Bulk import. It is possible to import several images at once with an archive.zip:
|
2.2.2. Create an annotated image
The SVG format is supported by translation tools: this allows a single image to be shared for all languages.
It is possible to create an image in SVG format of the Calenco interface:
Choose or from the content type drop-down list.
Click on .
The SVG image editor opens. For using the editor see Illustration editor.
2.2.3. To edit an annotated image
SVG images allow annotating photos and drawings. The translation of the texts they contain is simply supported.
Calenco includes an editor for this kind of images. For editing an annotated image see Illustration editor.
Click on the image to edit.
| |
Image title. By default, the title of images created with Calenco is “Layer 1”. This title can be edited in the area to the right of the edit area. |
3. To manage
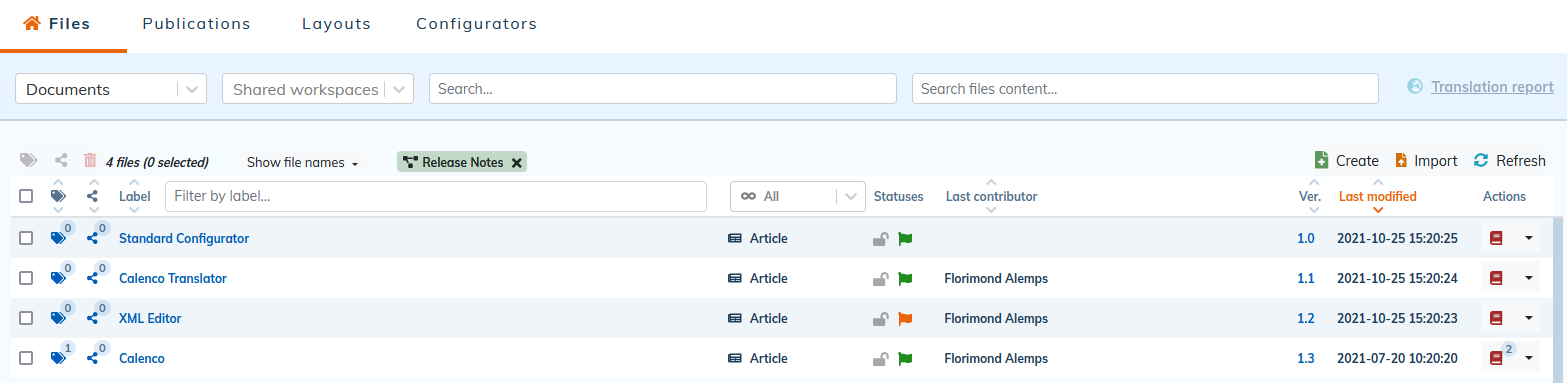
3.1. To display contents
Contents are displayed as a list.
The content labels can be modified by clicking on the pencil that appears when you hover the mouse over the label: this allows each content to be identified more precisely, without any impact on the content itself.
Images can also be displayed in a gallery.
A click on the preview of an image allows:
- To edit an annotated image (in SVG format);
- to preview the image and get additional information - especially the size which affects the size of your publications.
3.2. To filter content by type
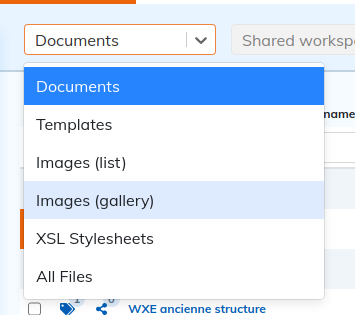
The option provides an exhaustive list of stored files.
3.3. To filter contents by language
Use the drop down menu to view contents in a given language (created or translated).
Check out the video of How to select a language in the interface:
3.3.1. To manage languages
The contents of a workspace can be produced or translated into different languages. This procedure allows the customer account manager to configure the language spaces of a workspace.
From the menu, click the menu.
Click on the menu Actions of your workspace:
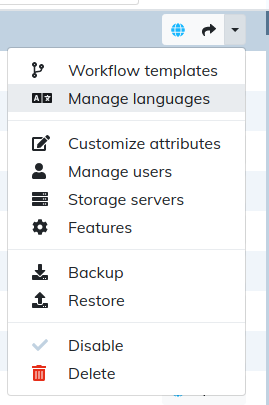
Select :
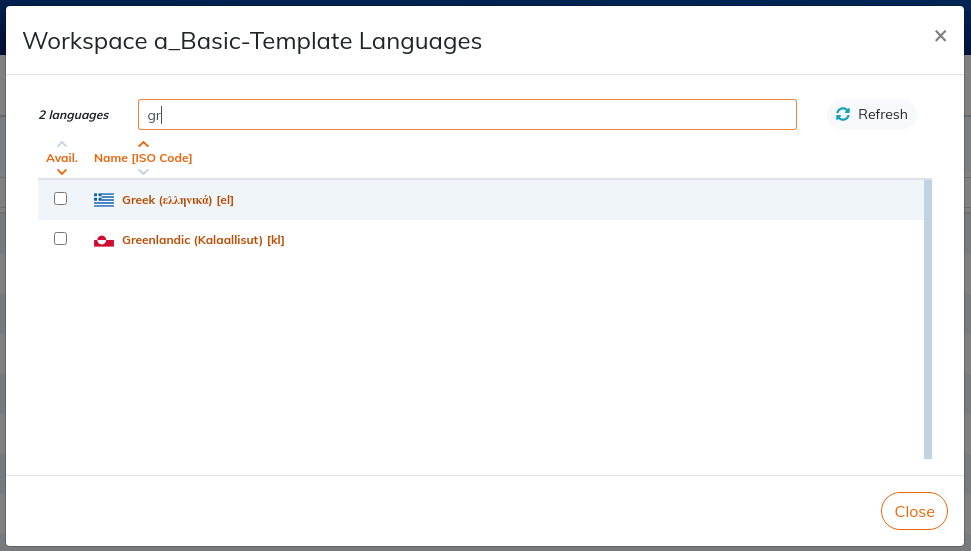
Tick the box to add a language to a workspace.
Untick the box to hide the language from the workspace.
The deactivated language will no longer appear in the affected workspace, but data remains.
3.4. To search for content
3.4.1. To sort list
To change the order of the rows (alphabetical or chronological), click on the label of any column.
3.4.2. Search by label, filename, date, last contributor, or format of image.
Enter letters or numbers in the field Search to filter the contents by the label. The first characters are often enough to complete the search.
Erase the entered characters to view the full list.
| Managing search criteria |
|---|---|
Each time you add a search criterion, to refine, a small tag is displayed above the list: |
3.4.3. To search by type of element
Documents can be filtered by root element type:
3.4.4. To search in documents
Enter a word or phrase in the field Search files content to find contents that contain that string of characters.
3.4.5. To search by tag
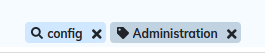
Each content can be associated with one or more tags. One can find the element by ticking the corresponding criteria(s).
3.4.5.1. To create a tag
Click on and follow instructions:
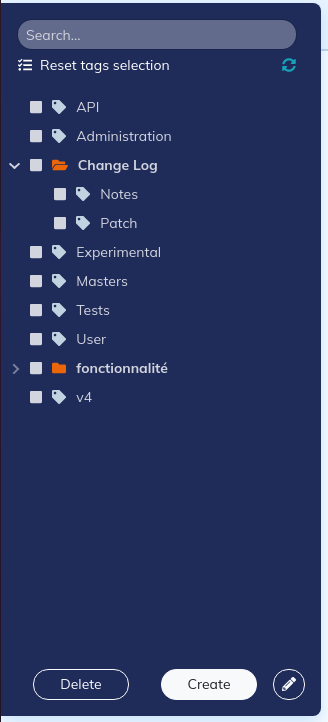
| |
Tags have nothing to do with traditional directories. Tags are more flexible and the search is more efficient because you cross axis of information. It is therefore essential to properly separate each kind of information. |
3.4.5.2. To tag contents
Click the icon  aside the content or at the top of the column when several contents are selected.
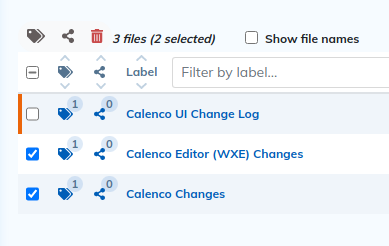
Contents to be (un)taggued are listed at the top of the dialog box.
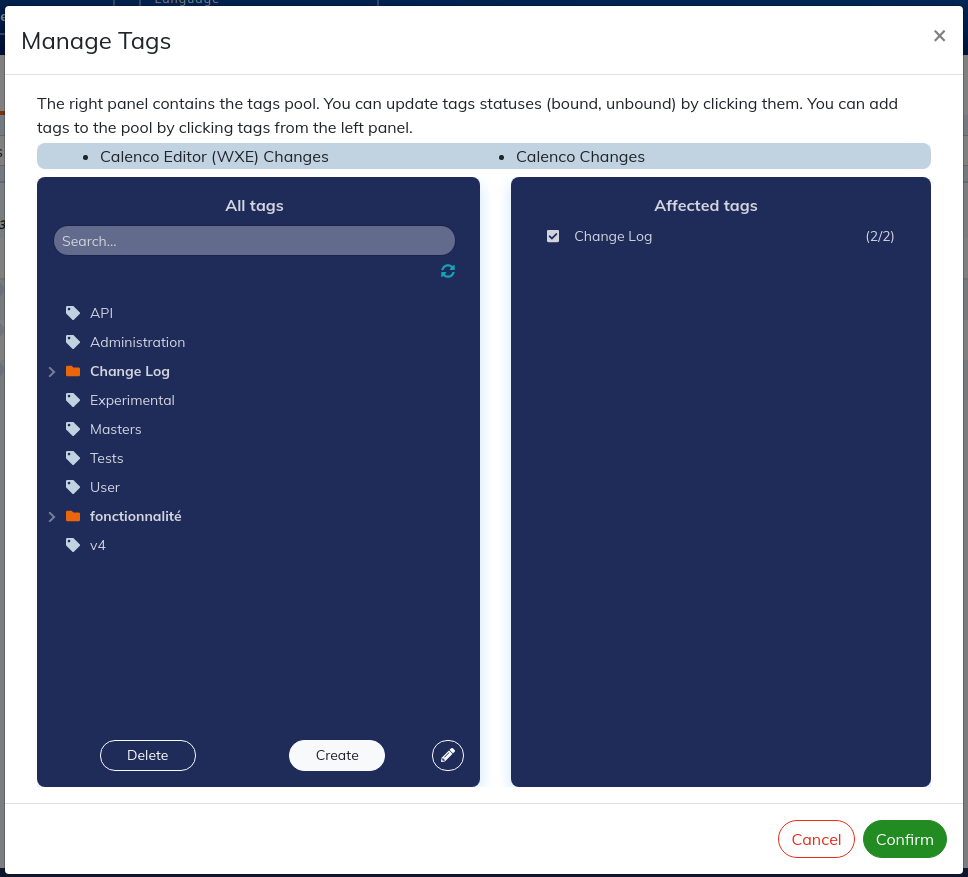
- The list of available labels is displayed on the left: a click allows them to be associated with the selected content(s).
Tags associated with the selected content(s) are displayed on the right.
- If a tag is not associated to all the selected contents, the box is ticked with -;
- If the tag is ticked, it will be associated to all selected contents after validation;
- If the tag is unticked, no content will be associated to it after validation.
| Import tagging |
|---|---|
When importing content, all the selected tags are associated with the imported elements. |
3.5. To consult the versions of a file
With each recording or import, Calenco saves a version of a content. The list of versions is accessible by clicking on the identifier of the current version (1.x).
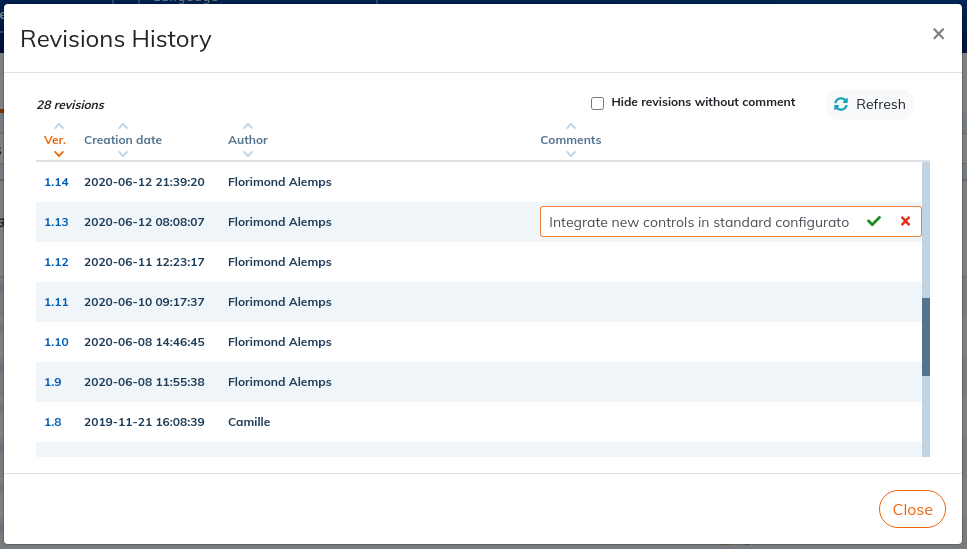
The history lists the following information:
- The version (counter);
- The date of the version;
- The author;
A description (empty by default).
To add a description, enter text in the field and save with Enter .
| Identified revisions |
|---|---|
Tick Hide unidentified revisions to filter only versions with a description. |
Procedure 3. Recover an older version
You can access an older version of the file.
Click on the version number.
Download it to your computer.
Re-import it with
Import.
Procedure 4. Compare 2 versions
You can also create a publication comparing 2 versions.
Click the compare icon
 for the 2 versions to compare.
A comparative publication is created. The name of the publication is composed of the DIFF prefix and the identifiers of the compared versions.
Click on it to open it.
- Added information is underlined and highlighted in yellow;
- Deleted information is striked out and highlighted in red ;
- Contents with modified attributes (as an example for profiling) are displayed in green.
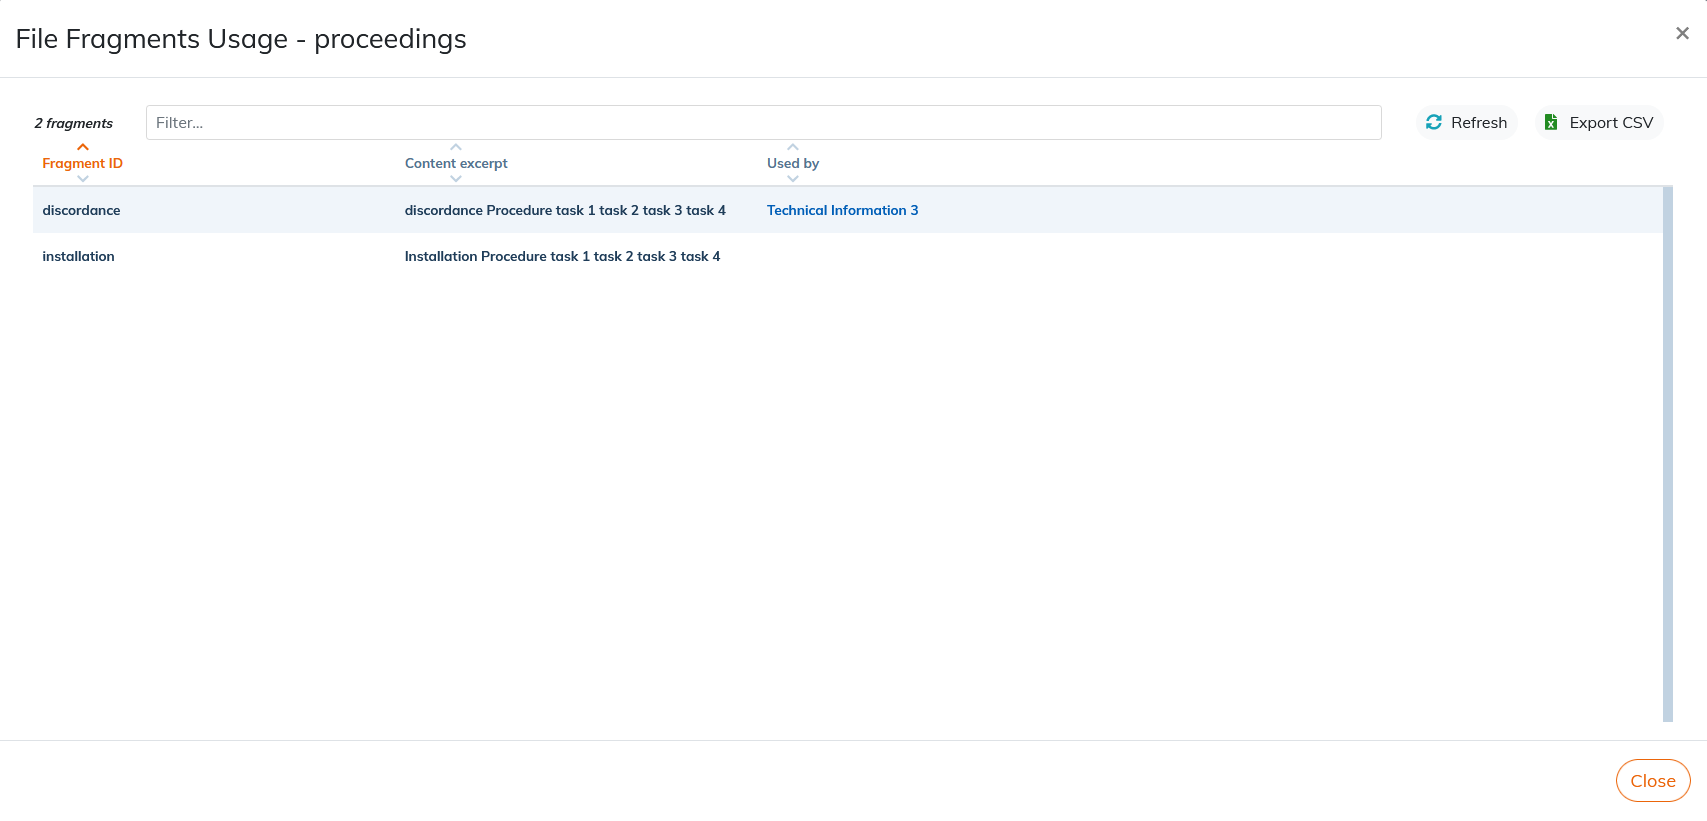
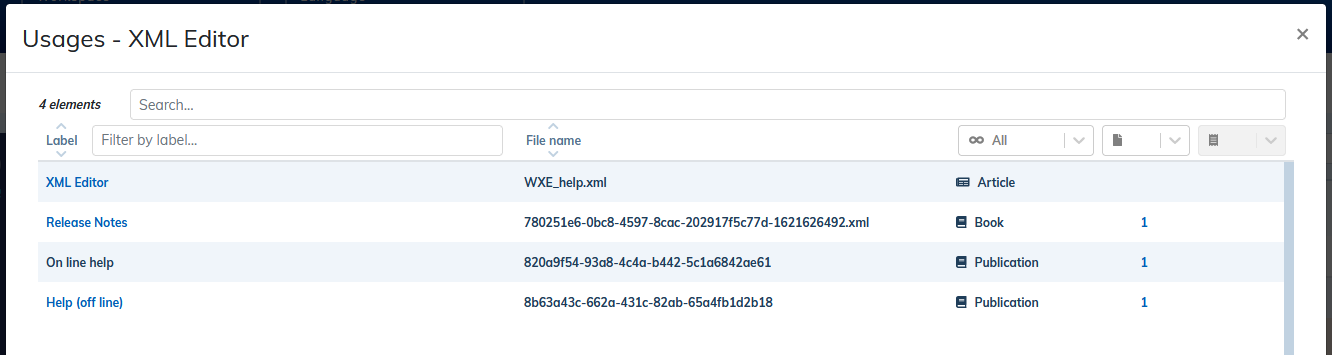
3.6. To study the impacts
Before modifying a module or fragment, it is sometimes better to check the where-used cases.
3.6.1. Consult the composition of a content
From the → menu of each content, you can see which reusable elements are part of that file:
3.6.2. Consult the use of fragments
From the → menu of each content, you can access the list of documents impacted by the use of fragments of this file:
3.7. To compare 2 contents
Click on → on the first file to compare.
Calenco highlights documents with the same type of structure in green: only these ones can be compared.
Select Compare two files in the menu action of the second file to compare.
A comparative publication is created. Its name is made up with the labels of the 2 files separated by
_vs_.
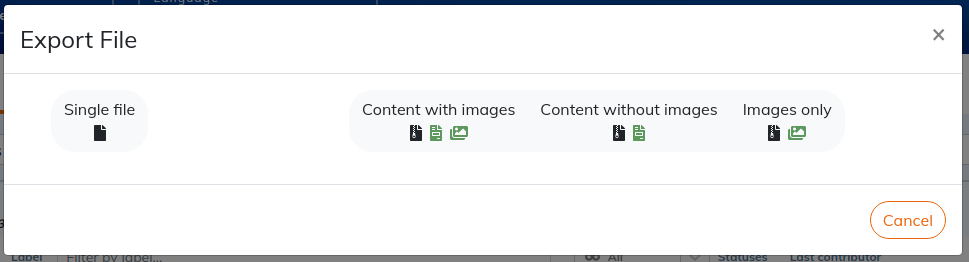
3.8. To export
You can export contents from Calenco at any time. Choose the option that matches your goal:
3.9. To delete files
Click in the → menu on the line of the content to be deleted.
Select the contents to delete with the check boxes then click on the trash bin icon at the top of the list.
| |
Content deletion. This action is irreversible: the selected content and all their versions will be permanently deleted from the content database. An error in the form of a notification indicates the impossibility to delete a file, specifying the reason (file locked, included, shared):  Click on the reasons “included”, “shared” to see the usages of the file or the workspaces it is shared with. |
4. To collaborate
4.1. To set up workflow
| Option |
|---|---|
Please contact your usual NeoDoc contact ( |
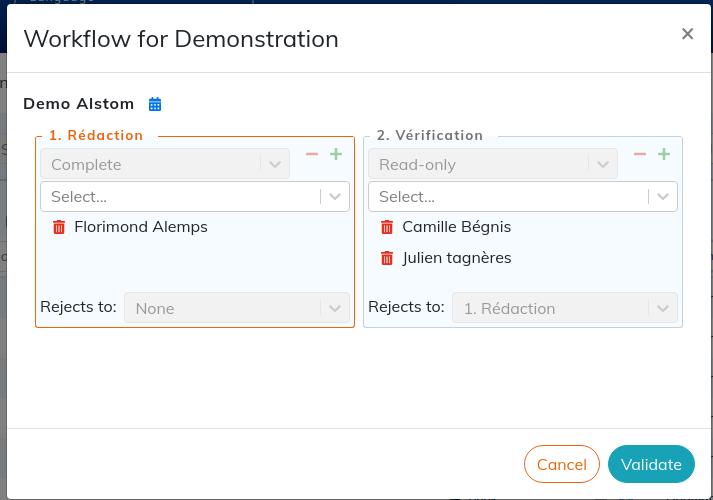
4.1.1. Define a template of workflow
| |
The workflow is organized within a workspace. Everyone involved in the workflow must have a Calenco account. |
In the workspace, you can create templates of workflow.
From the menu, click on the menu.
Click on the → :
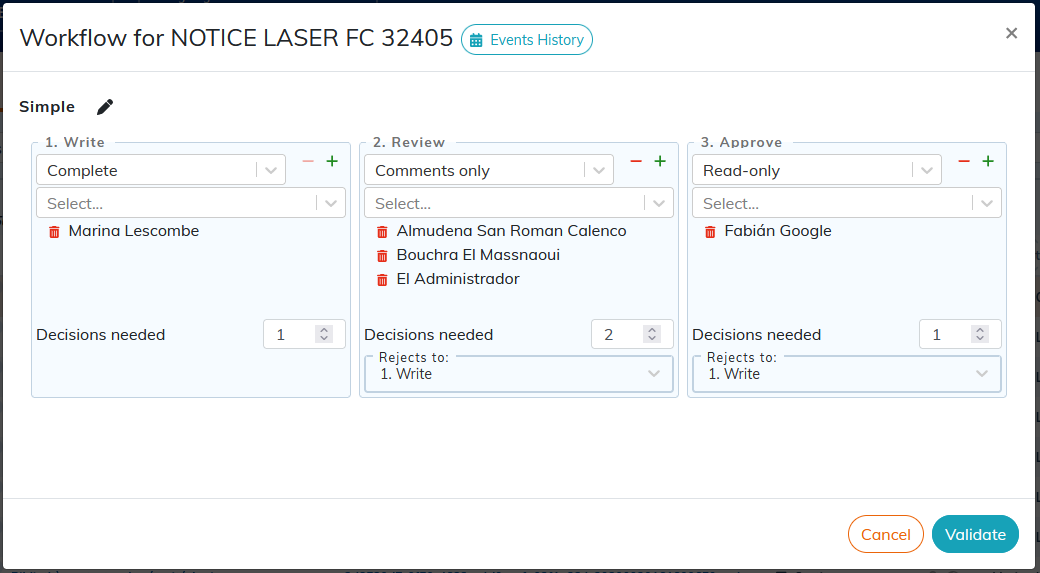
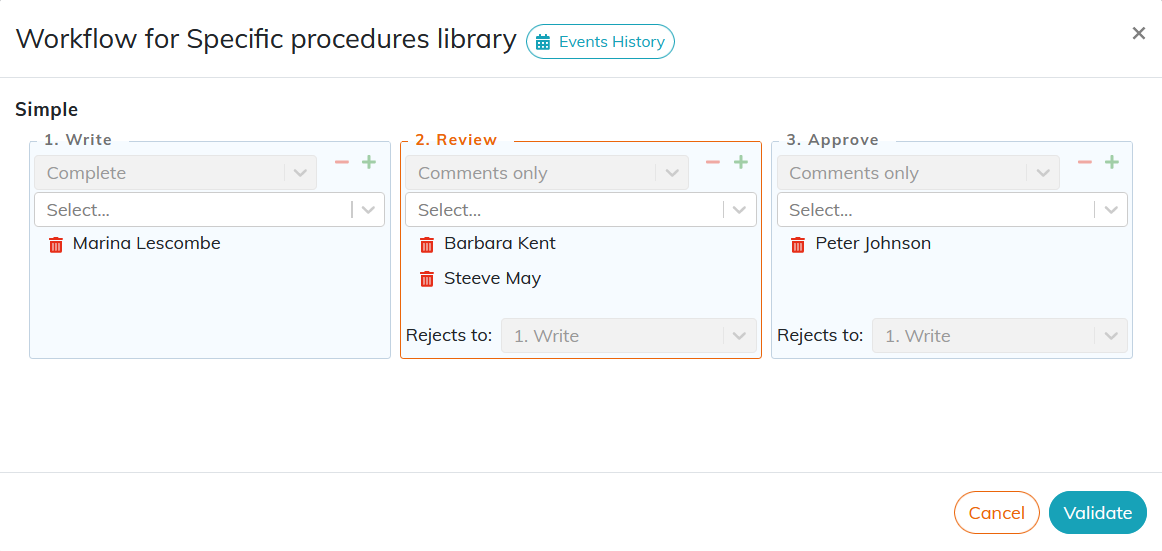
You define:
- the number of steps;
the level of access at each step:
- Full write access,
- Access with the possibility to comment only,
- Read only access,
- Access via an online form for operators (configurator).
- The number of decisions needed to move the workflow to the next step;
- Step to return to in case of rejection of the task.
4.1.2. To create the workflow of a document
Click on the menu and choose a template.
The template quickly instantiates a workflow but you can modify all of its characteristics.
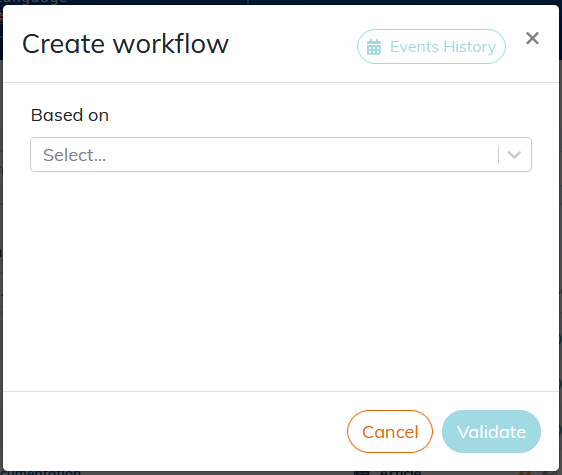
| |
You can create a document workflow even if there is no custom templates for the workspace. |
For each step, select individuals who need to act.
Users assigned to a task receive an email when this task of the workflow is active.
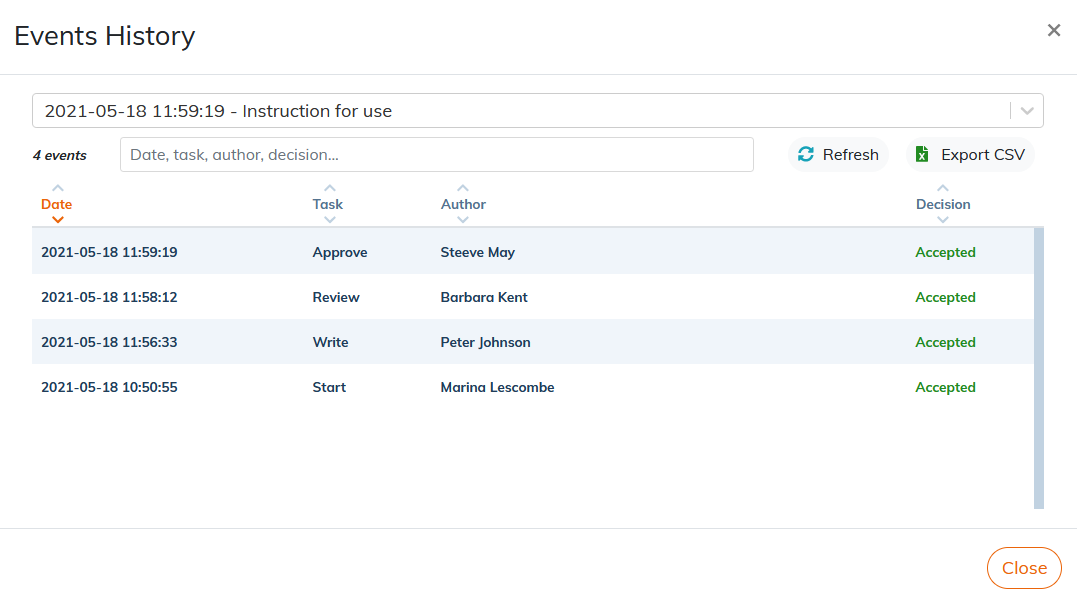
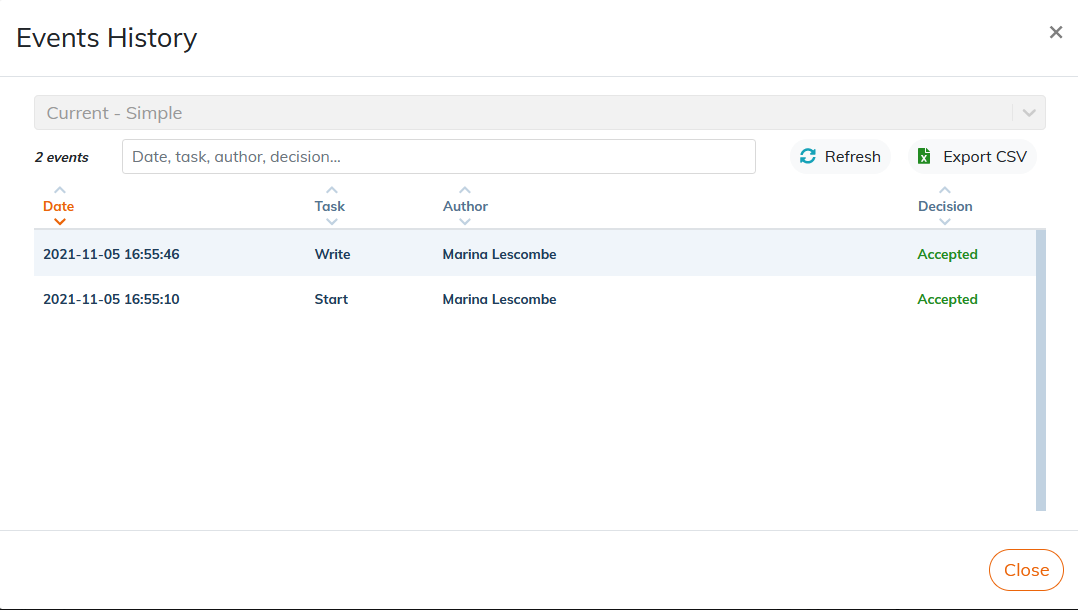
4.1.3. View workflow history
To view the history of workflows associated with a document, use the menu. Depending on whether or not a workflow is in progress, you will have access to the history via the button:
4.1.4. Modify a workflow in progress
A document is associated with one workflow maximum. In the contextual menu of a document, Calenco proposes:
- to create a new workflow if there is none in progress;
to interact with the workflow in progress:
- to see the current task,
to reassign tasks:
For a task in progress, it is possible to assign one or more users who will receive an email-notification. It is possible to delete one or more users assigned to a current task without them being notified.
After deleting the assigned users, the workflow goes to the next step provided that all other users assigned to this step have completed their task.
For pending tasks, it is possible to assign or delete one or more users without them being notified by email.
- to view the history of previous tasks:
4.1.5. Run a workflow task
Users can access their tasks list via the button at the top right:
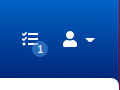
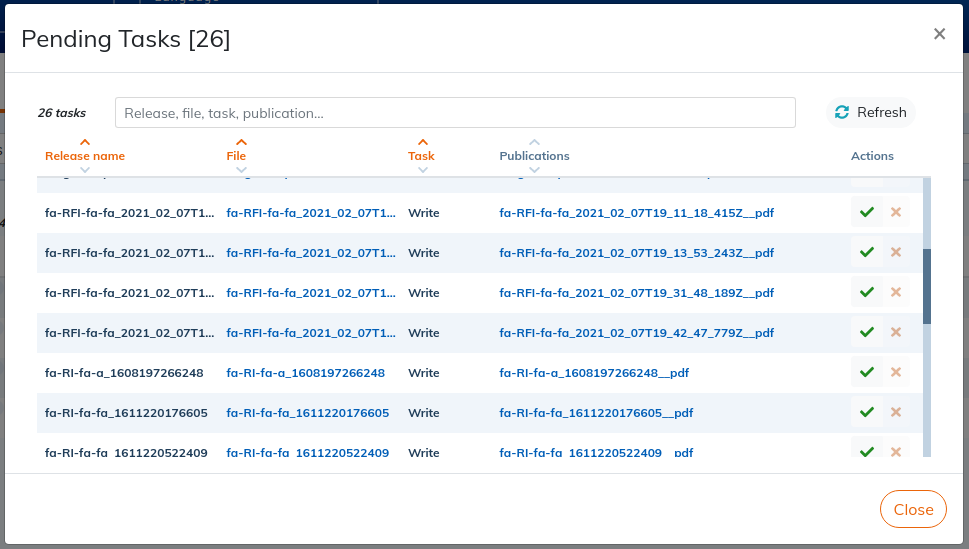
Each row corresponds to a task, associated to the current workspace or not. The following information is available:
- Identifier of the workflow;
- Label or name of the document allowing access to the editor with the defined access level;
- Assigned task;
- Publications of the document - accessible by clicking;
The green check mark to validate the task after completing it,
The red cross to reject the task after completing it.
When a task is assigned to several users:
- The workflow returns to the chosen task if one of the users rejects it;
- The workflow goes to the next task when all users have validated their task.
Affected users are notified by e-mail (seeTo adapt).
Check out the video of the Workflow:
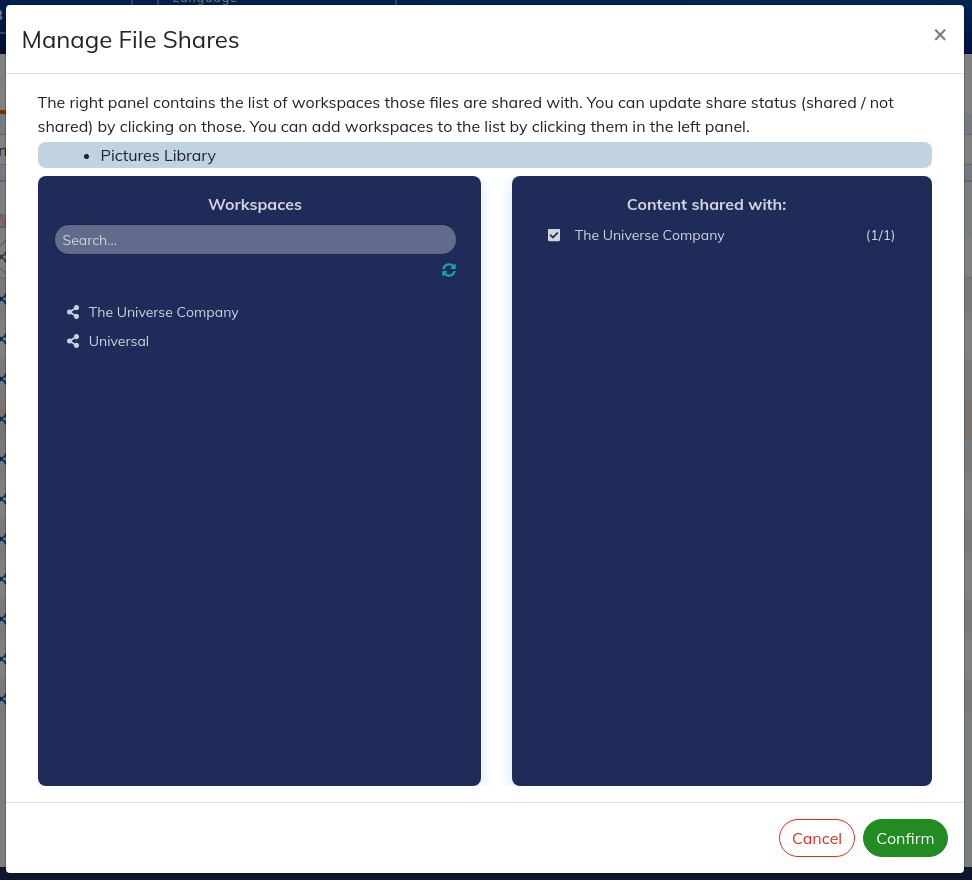
4.2. Sharing between workspaces
This feature allows you to share the contents of a workspace (S: source) with the users of other workspaces (T: targets). Thus, a user who only has access to a workspace T can, however, integrate content from the workspace S into his documents, without however being able to modify these shared contents.
| |
Content shared by the source workspace should not be re-shared by the target workspace to another workspace. This risks causing malfunctions in the system (circular references, loss of visibility of inclusions, loss of data sent for translation). |
| Option |
|---|---|
Please contact your usual NeoDoc contact ( |
4.2.1. To configure sharing of a workspace
It will first be necessary for the administrator to allow sharing between a source workspace (which contains the contents to be shared) and a target workspace.
From the menu, click on the menu.
Click on
 Share.
The administrator configures by selecting the target workspaces:
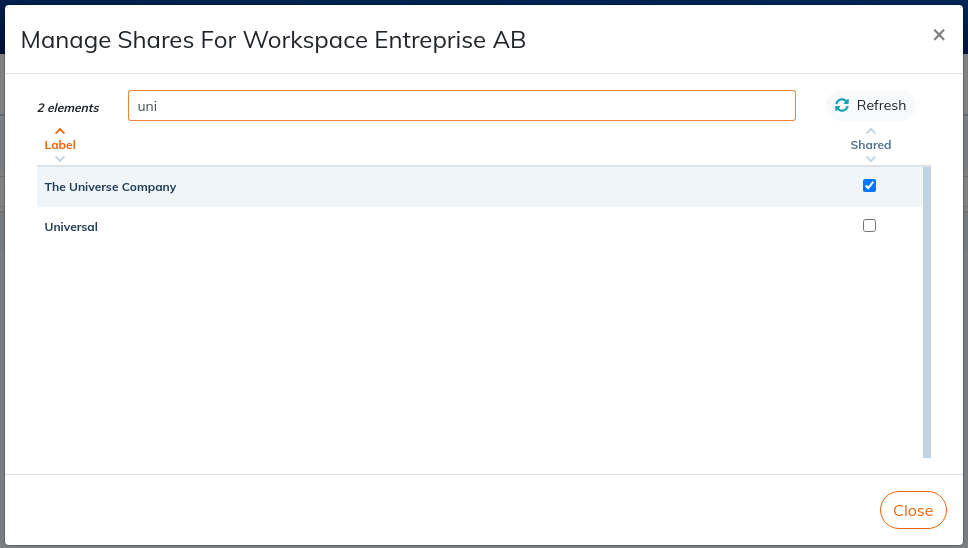
4.2.2. To share contents
The operation is very similar to that of labels (To tag contents): click on ![]() in front of a content or at the top of the column when more than one content is selected.
in front of a content or at the top of the column when more than one content is selected.
- Click on the target workspace to share the selected contents.
- Untick the target workspace to stop sharing the selected contents.
Check out the video Sharing content between workspaces:
5. To translate
Calenco Translator allows you to connect Calenco to two CAT[1] tools:
Consult the complete CAT online help:
5.1. Administrer Calenco Translator
There are two Calenco Translator user roles:
- Administrator: has all the rights available in the CAT tool.
- Project manager: can manage the translation project assigned to him, manage the translation memories and term bases of his project, define the parameters for his project.
- Linguist: can edit the translation task(s) assigned to him to perform the translation.
Depending on the choice of license type for the CAT tool, the subscription to Calenco Translator options and the choice of roles and management rights of the CAT tool may vary:
Table 1. Calenco Translator Packs according to license type
|
CAT License Type |
Subscription to Calenco Translator |
Necessary roles and rights |
|---|---|---|
|
customer license (Phrase or SmartCat) |
Connector subscription |
Autonomous account management: administrator, project manager and linguist |
|
license (Phrase or SmartCat) of the language service provider (translation agency) |
Connector subscription |
To configure the connector: project manager at least For Client Access: To be checked with the provider as needed |
|
hosting on Calenco's Phrase platform |
Connector subscription + translator license (linguist)[a] |
Project Manager with Restricted Rights linguist |
[a] For any creation, modification or deletion of linguists, please contact your usual Neodoc contact ( | ||
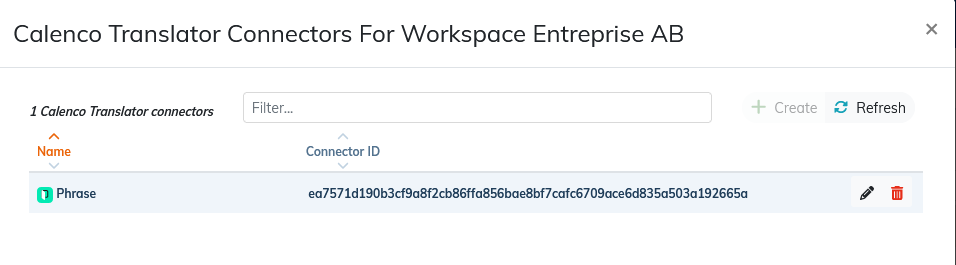
5.2. To connect Calenco Translator
The system administrator (your usual contact at NeoDoc) can connect a workspace to one of two CAT tools to activate the translation.
The information to be provided is the account identifiers with the “project manager” role in the CAT tool:
For Phrase
- the user name;
- the password.
| |
To make a translation request in Calenco, the project manager must have the following rights:
|
For Smartcat
- Account ID
- API Key
| |
This information is to be retrieved on this link. |
| |
Only one connector can be set up for a workspace. If it is necessary to change the CAT tool, delete the existing connector and recreate a new one. |
To check for the presence of the connector for the workspace:
From the menu, click on the menu.
Click the menu.
When the connection is established, Calenco displays:

| |
It is no longer necessary to add target languages in Calenco Translator or CAT tool. The system recognizes the source language and the target language and automatically creates respective language pairs in translation projects and for the translation memory (if required). |
5.3. To ask for translation
| |
For files being edited, the last saved version will be sent for translation. Make sure all changes have been saved before sending the document and its dependencies for translation. |
- Choose the → menu on the document to translate.
- Choose the target languages into which the document should be translated:
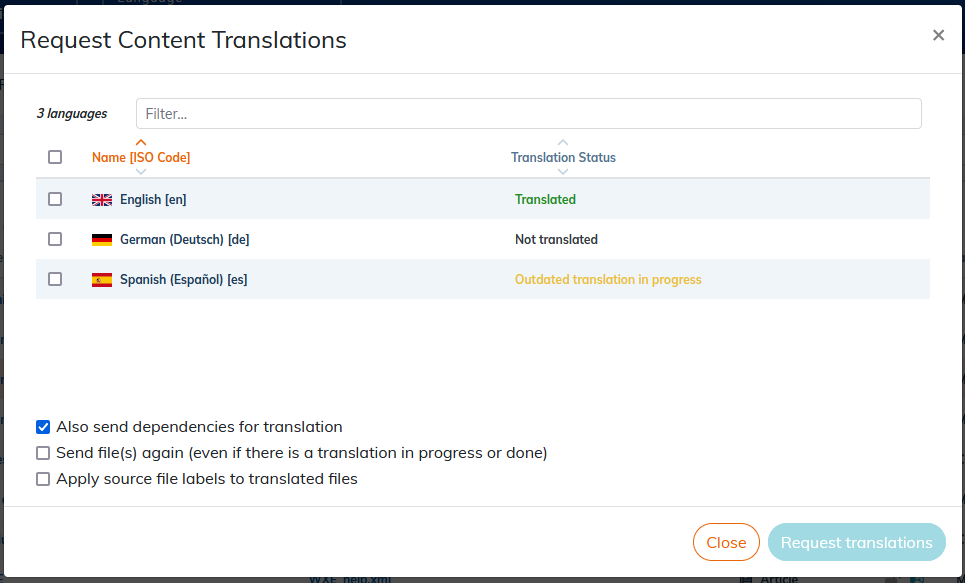
Possible translation statuses
 : the file is not translated for the corresponding language;
 : the file has been translated, but some segments are not up to date in the translation;
To update the file, ask for a new translation. Only segments that are not up to date will be translated again.
 : the file has been translated and is being translated in order to update it;
 : the file is being translated;
 : the file is translated and up to date.
Options available for sending for translation
- Also send dependencies
- By default, the modules included in the current document will also be sent for translation. [2] If you only want to send the current content, uncheck this option.
- Force sending in translation
- If content is already being translated, it is not normally returned for translation. But it can happen that it is necessary to force sending some content for translation, even if it has already been sent.
- Apply source file labels to translated files
When creating a document in Calenco or when returning the translation to Calenco, the label of the files displays the title of the document. In order to locate files easily, it may be necessary to keep the labels of the source files for the translated files,
To take advantage of this feature, the initial label must be edited at least once.
Each time the label is modified, Calenco asks you if you want to propagate the label from the source file to the translated files.
There are two other ways to apply source file labels to translated files:
Procedure 5. When sending to translation
When requesting a translation, select the Apply labels from source files to translated files check box .
When you return to Calenco after translation, the labels of the translated files remain identical to those of the source files.
Procedure 6. For existing translations
On the menu for the document that has translations, tap the button.
The modification is taken into account, if the label of the source file has been edited at least once.
The button remains inactive if the label has not been edited and/or the file has no translations.
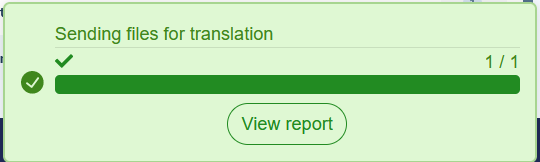
Click on in the notification at the bottom right of the screen to see the set of files sent for translation:
Translation requests made here are received by a project manager on the Calenco Translator platform.
| |
Translation status. One click on the translation status |
5.3.1. What is sent for translation?
When you select a file for translation, the following files are sent - if they have been changed since the last translation in the same target language:
- the file itself;
- the contents included in this document;
- SVG illustrations included in these documents.
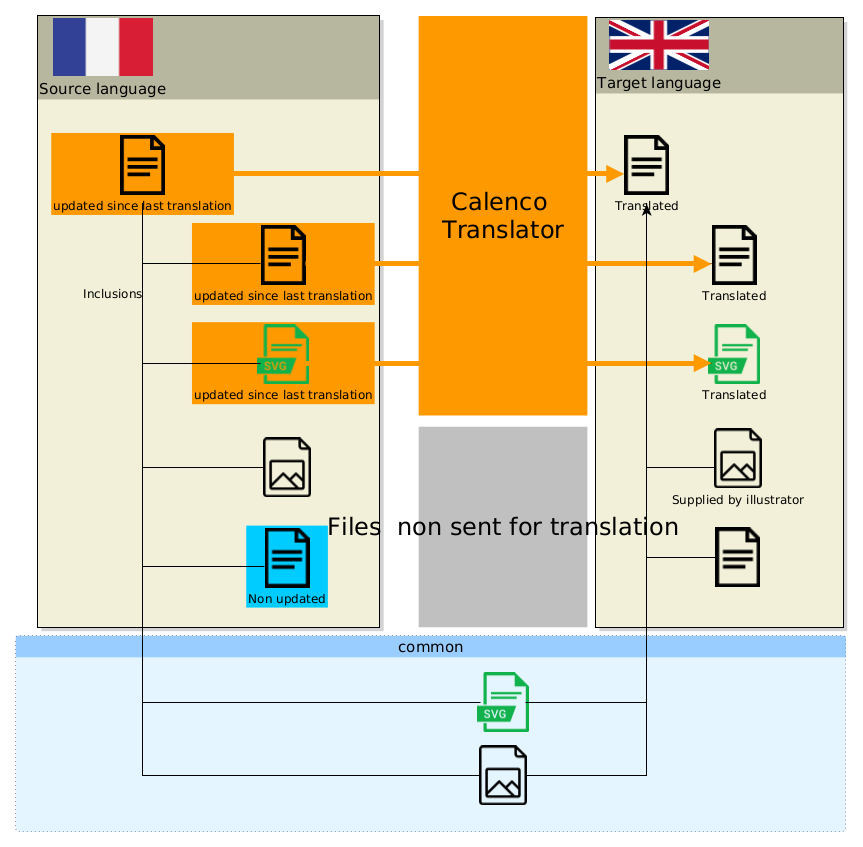
| Translation of images |
|---|---|
Apart from images in SVG format, images are not translated. The writer must produce the images in the target languages - with the same file name as in the source language (see To import an image). |
| |
In the case of the translation of inclusions coming from a shared space, it is necessary to ensure that the two workspaces have the same source language. |
5.4. Translation tracking
5.4.1. Translation report for a source document
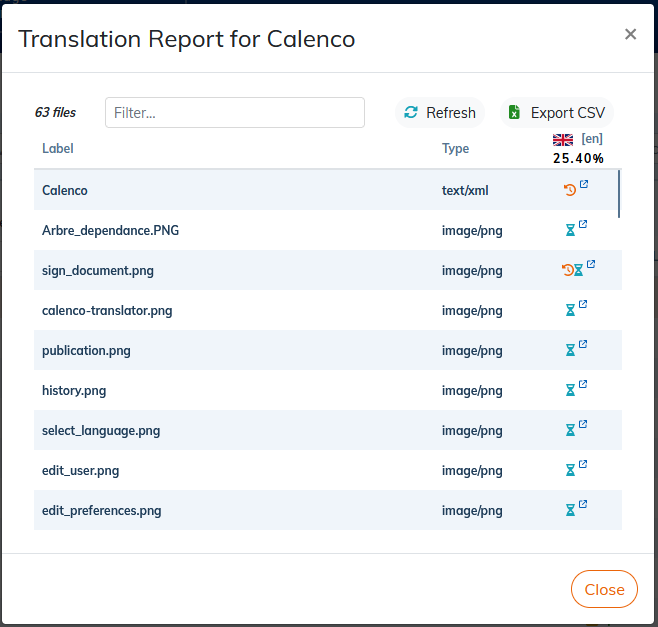
Icon ![]() gives access to a translation report of the selected document and all dependencies, in all target languages.
gives access to a translation report of the selected document and all dependencies, in all target languages.
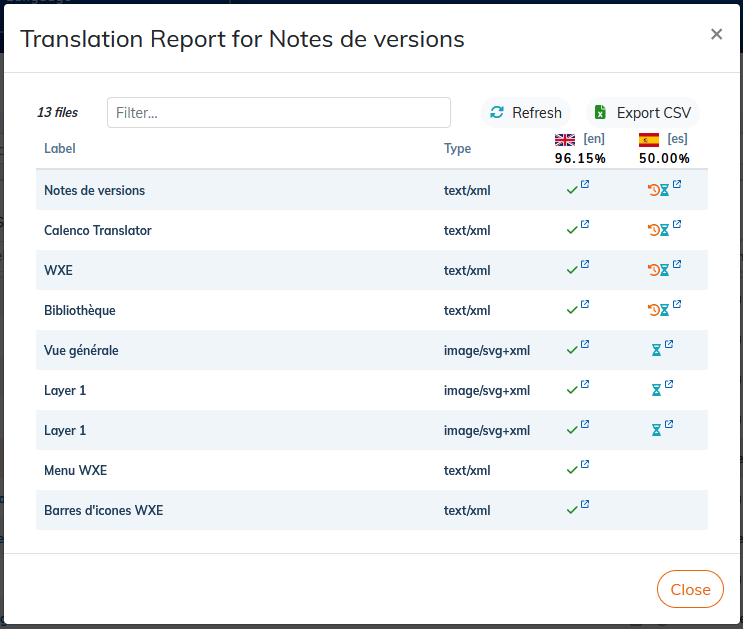
The search field is used to filter the lines to display, for example, only the obsolete translations.
The translated files are stored with the same name in the target language, with the same publications as the source language.
5.4.1.1. Access to the translation interface
It is possible to access the file to be translated in the CAT tool editor directly from the translation report for the source document.
Just click on the symbol next to the translation status for the desired file in the desired language. The file opens in the CAT tool editor.
This feature can be used with the status:
- “Translation in progress” and “Obsolete translation in progress” to be able to continue the translation at any time;
- “Translated” or “Obsolete” Translation to make fixes, adjust tags by revalidating translation with the Completed state (see Manage the status of a translation job).
5.4.2. Translation report for a translated document
In the target language, the icon ![]() allows you to access a report of the translated document to see the translation status of its dependencies in that language.
allows you to access a report of the translated document to see the translation status of its dependencies in that language.
The file to be translated can be accessed in the CAT editor directly from the translation report for the translated document (see Access to the translation interface).
6. To publish
Publishing consists of transforming a document into a format suitable for its dissemination, via a style sheet that defines its final graphic appearance.
| Custom layouts |
|---|---|
Advanced style sheets are not customized by default. They are provided by NeoDoc on demand for a specific layout and data transformation. |
6.1. To create a publication
| Publications of a document created from a template |
|---|---|
The publications defined on a template are automatically recreated on the instances of this template (Create a content template). |
Click on the icon
 corresponding to the document.
Click on .
| |
It is possible to create several publications for the same document at the same time by pressing to the right of the “Publication 1” tab. |
Procedure 7. To create a basic publication
Select the template of layout from those available in PDF and HTML formats.
Adjust the name of the publication if necessary.
Select an output format in the drop-down list.
If necessary, select a layout format.
If you do not want to create other publications, click Validate.
The green check mark in the Status column confirms the generation of the publication.
Clicking on the name of the publication delivers the result:
- Download PDF;
- Open html page in another tab of the browser.
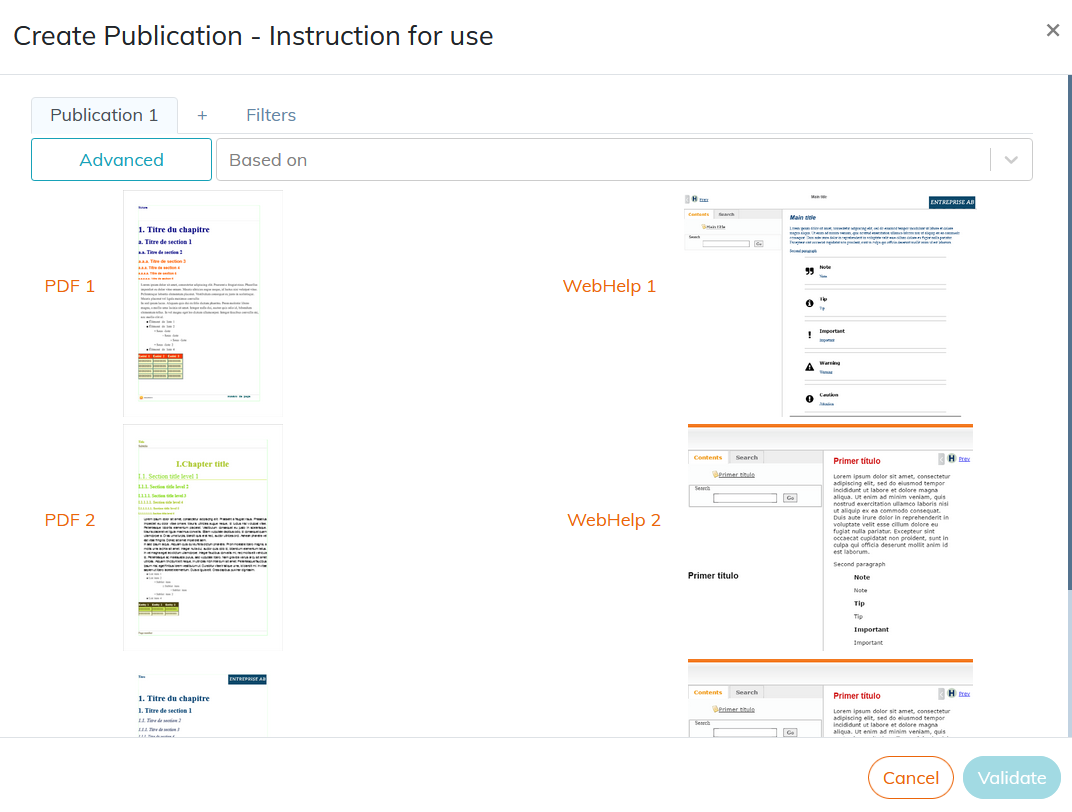
Procedure 8. To create an advanced publication
Click the Advanced tab.
Fill in the name to identify the publication.
Select an output format in the drop-down list.
If necessary, select a layout format.
If you do not want to create other publications, click Validate.
The publication is added to the list of existing publications.
Procedure 9. To create a publication based on another publication
Click in the Based on field, select an existing publication.
In the field Name, the file name is automatically set with the name of the field Based on. Rename the publication if you want.
If you do not want to create other publications, click Validate.
| |
Filters. The values selected in the Filters tab are applied to all publications created simultaneously (see To define the filtering criteria of a publication). |
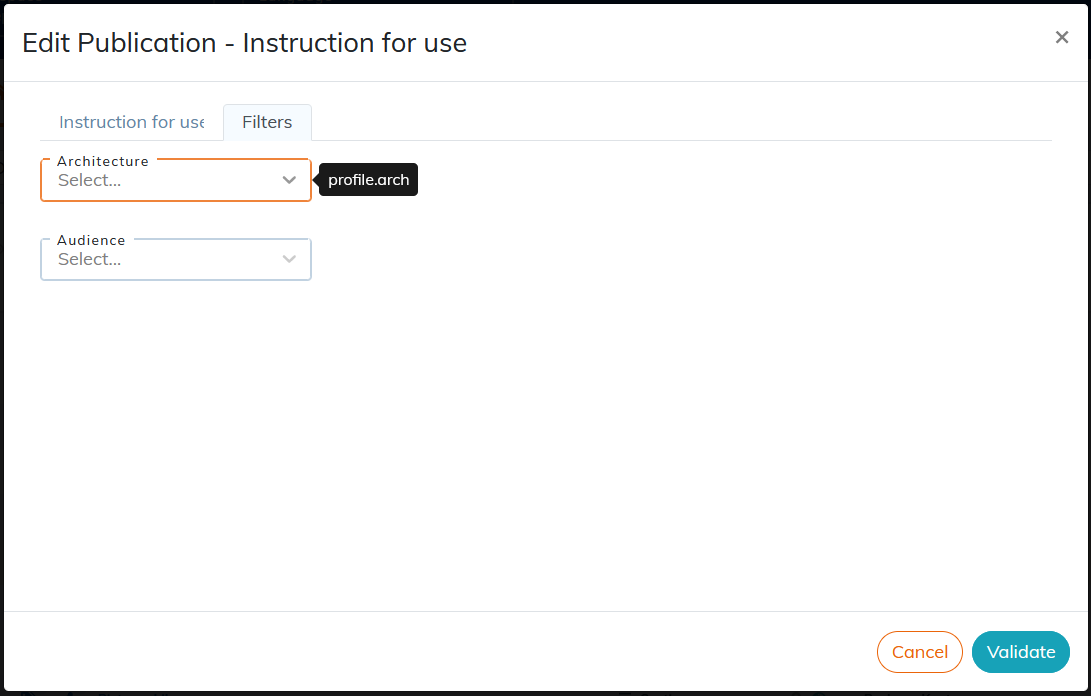
6.1.1. To filter content
This feature allows you to filter elements that do not match the goal of the publication. This makes it possible, for example, to generate two versions of the same document intended for two audiences who do not need exactly the same information.
The two stages of filtering
- To profile elements (To profile);
- To configure publications.
To work, the filtering and profiling information must be consistent: this is why it is preferable to define these conditions at the level of the workspace (seeTo customize attributes).
| |
This personalization has no impact on the content: already profiled elements are not impacted by any change at workspace level. |
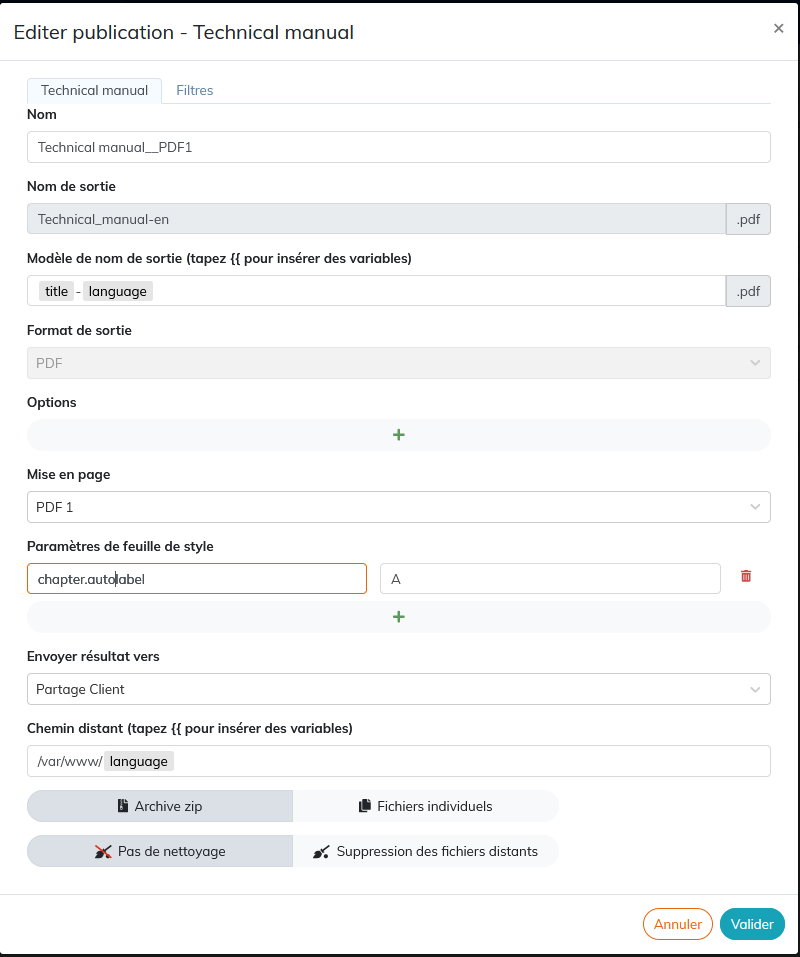
6.1.2. To configure a publication
|
|
For advanced users, this window will allow to modify all the possible parameters of the publication: Name
Output Name and Output Name Template The output name is assigned to a publication when it is downloaded or sent to an external server (see Send result to). By default, the output name is the same as the name. The output name can be configured:
The available variables are:
For example, by setting the Output format
Options The options are specific to each output format. Main options are:
Layout
Parameters of a style sheet
Send result to
|


Check out the video of the principle Multi-format publications:
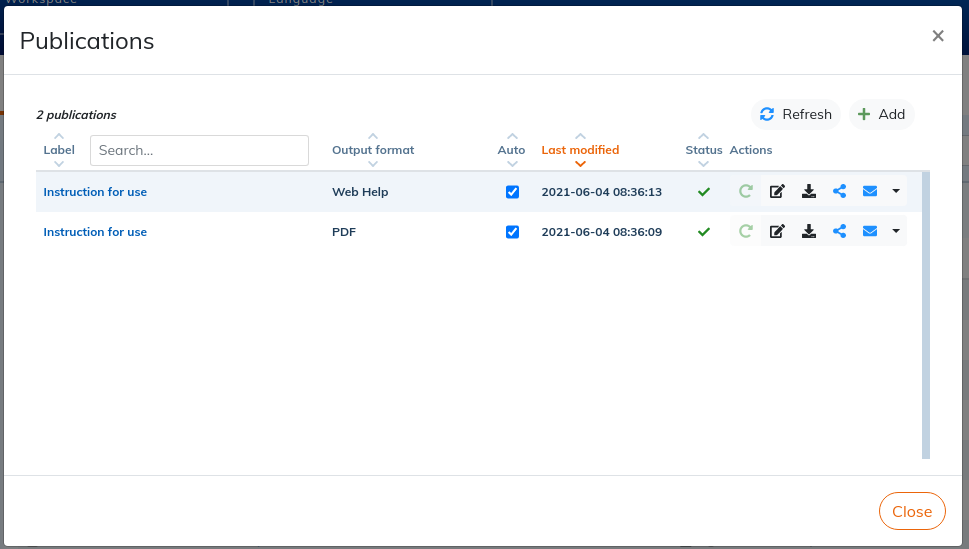
6.2. To manage publications
You can access the publications either via the icon ![]() of each document, or via the Publications tab of the interface which gives access to all the publications available in the workspace and in the current language.
of each document, or via the Publications tab of the interface which gives access to all the publications available in the workspace and in the current language.
6.2.1. Access to the list of publications of a document
This feature list existing publication, eventually to modify or to delete them or to create new ones.
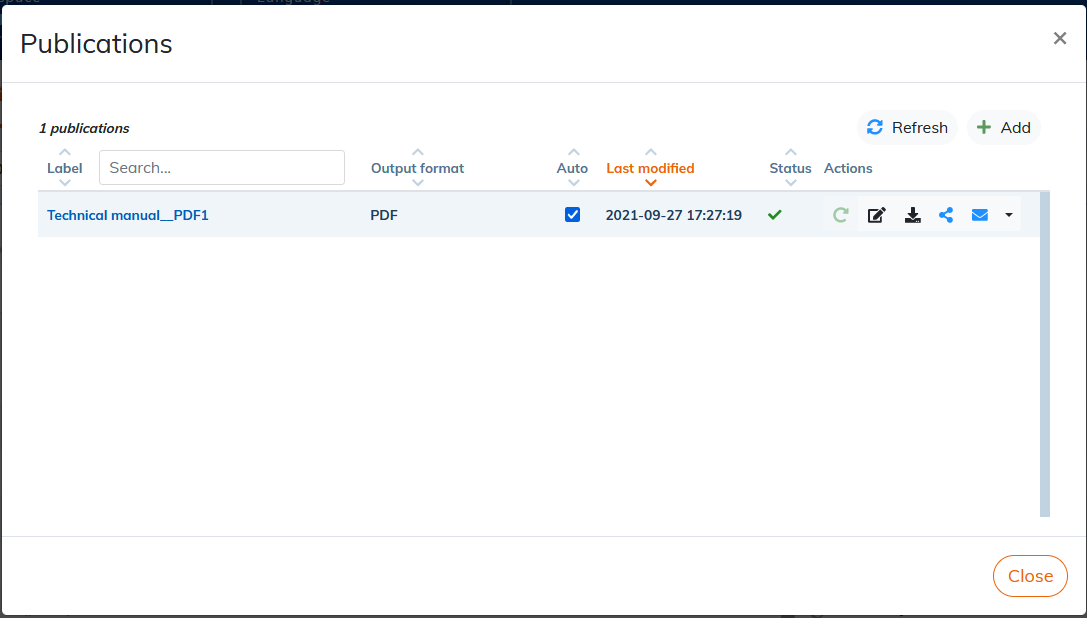
6.2.1.1. Automating
Update of the publication
- Automatic: the publication is updated as soon as a content or the style sheet is updated and the concerned file is closed in the editor;
- Manual: publication is updated when the user regenerates it.
Tick or untick the box Auto to switch modes.
| |
It is possible to cancel publications being created or regenerated by pressing |

Interpretation of post status
 post obsolete;
 up-to-date publication;
 broken publication Check the logs in the menu or contact technical support;
 for remote publications, being sent to the FTP server or by email;
 published with missing included content. Click on the icon to read the report;
 failed post with missing included content. Click the icon to read the report.
| Duration of publication |
|---|---|
If a lot of publications are in automatic mode and you edit content that is reused extensively, all of those publications will be regenerated on each save! This could lead to very long publication times. |
6.2.2. To download the result
You can download the publication on your computer, whatever the format. A publication in Web format is downloaded via a ZIP archive containing all the resources necessary for navigation.
6.2.3. To share a publication
Click on the icon ![]() to share the link to the result of the publication and share it by mail or through other medias (LinkedIn, Twitter, FaceBook...).
to share the link to the result of the publication and share it by mail or through other medias (LinkedIn, Twitter, FaceBook...).
Calenco can also directly create an email containing this link using your email application via the icon ![]() .
.
| Data security |
|---|---|
Publication is accessible, without password, to any person having this link. |
6.2.4. To electronically sign a publication
| |
This feature is an option that works in connection with your DocuSign account. Please contact your usual NeodDoc contact ( |
The icon  allows you to transfer the PDF publication of your document to DocuSign for signature:
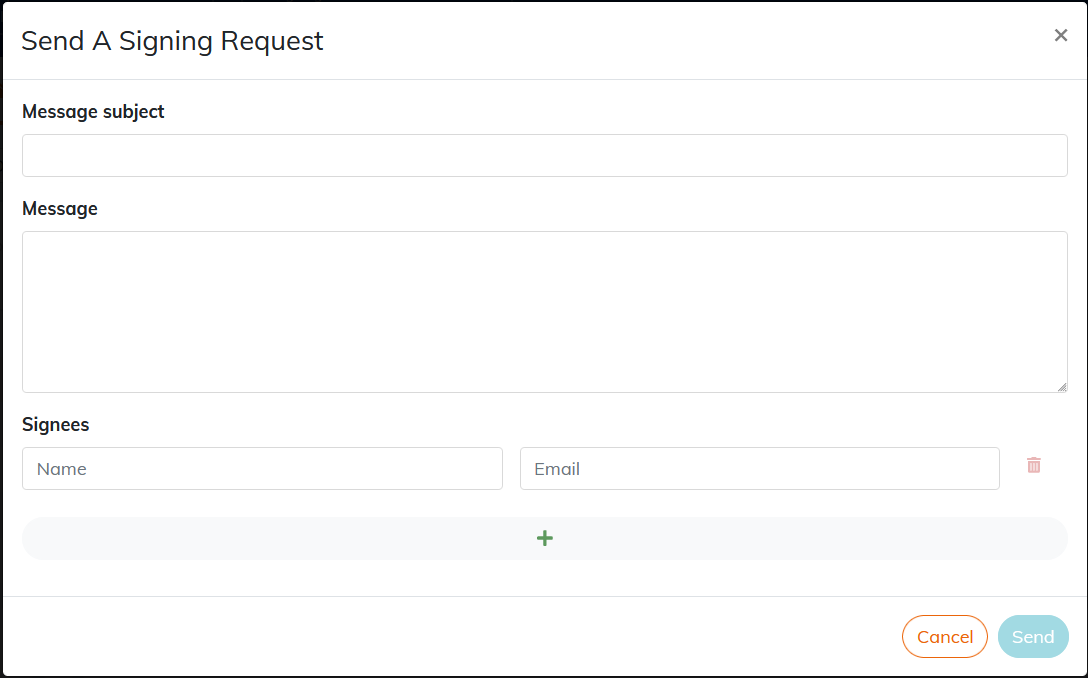
Persons about to sign will receive an email from DocuSign with the subject and body of the message entered in Calenco.
There can be up to 5 signatories for a document.
Go to section Electronic Signature to prepare documents for electronic signature.
6.3. Reveal style sheet
Using the Reveal style sheet allows you to publish a document in HTML presentation format.
Navigation in the reveal presentation is done via the clickable table of contents or using the arrows positioned at the bottom right of each slide.
| |
If the reveal-calenco.xsl style sheet is not present in your workspace, contact NeoDoc technical support. |
6.3.1. Edit xml content
The structure element to use for writing content is article.
The content is organized between two levels of sections:
- each first section level is a slide with horizontal scrolling.
level 2 sections generate slides with vertical scrolling.
The contents are considered as sub-parts of the level 1 section. In this case:
- the level 1 section should contain only the title that will appear in all sub-sections in the publication.
- the title of level 2 sections can be left empty, if necessary.
| |
Please ensure that the content of each section fits on one slide. This style sheet does not provide automatic advance to the next slide. |
6.3.2. To create a publication
Select the output format: HTML 5 Format (Multiple Pages).
Select the layout: reveal-calenco.xml (or the name given to your custom reveal stylesheet).
6.3.3. Configure the features
Display an image on the cover page
Two methods exist:
Procedure 11. Method 2
In the publication settings, use
titlepage.image.Specify the file path and file name. Example for a file stored in the French language: fr/monfichier.jpg

Procedure 12. Display an image in the footer
In the publication settings, use
logo.image.Specify the file path and file name. Example for a file stored in the French language: fr/monfichier.jpg
Procedure 13. Embed a video
Retrieve the video sharing link from the Youtube page, Vimeo or your server.
In the editor add the
videoobjectelement.For the
videodataelement paste the link in thefilerefattribute.
Procedure 14. Change the number of columns in the table of contents
In the publication settings use
toc.column.countwith the desired value.
Position an image on the page. The image is centered horizontally on the page provided that at least one property of its width or height is indicated.
Successive display of the elements of a slide. The role=incremental attribute can be used to fget successive display of elements in the slide.
This attribute can be applied to a bulleted or ordered list. In this case, each item in this list must be assigned the role=fragment to make them appear one after the other.
| |
It is possible to use other existing functionalities for this style sheet such as for example:
Their configuration requires specific development for the customization of the provided style sheet. |
7. To adapt
Various settings are possible to customize the display of the workspace you are working on. Click on in the drop-down menu of your profile, represented by a small silhouette at the top right:
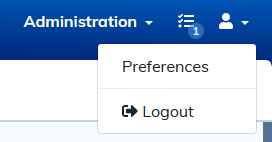
A new window appears:
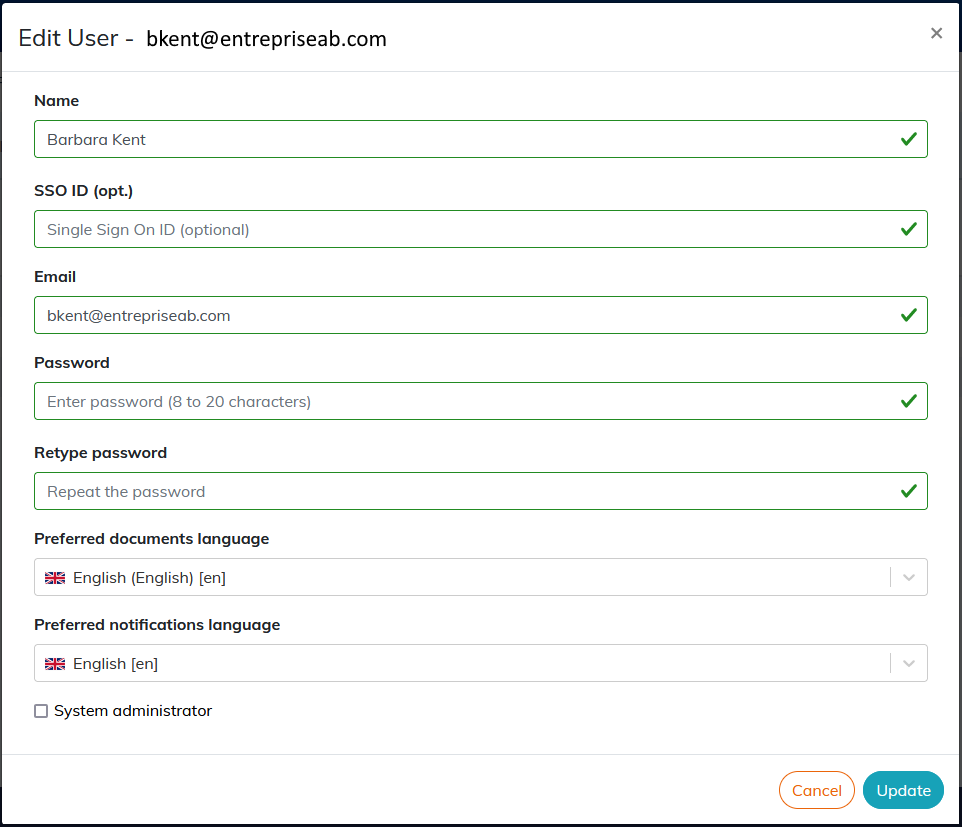
The following preferences can be edited:
Calenco identifies you via your email.
Your name is displayed when completing some actions (modification, workflow...).
Your password.
It is necessary to enter your
current Passwordbefore entering theNew passwordif you wish to update it.The password must be at least 8 characters long. It should not contain the username or email address, but upper and lower case letters, numbers and symbols.
It is easier to request a password update on the login page via
I forgot my password.- Calenco lists documents in the
Preferred documents language. - Notifications are sent in the
Preferred notifications language.