Calenco Translator
User guide
2. Administrer Calenco Translator
Calenco Translator allows you to connect Calenco to two CAT[3] tools:
Consult the complete CAT online help:
There are two Calenco Translator user roles:
- Administrator: has all the rights available in the CAT tool.
- Project manager: can manage the translation project assigned to him, manage the translation memories and term bases of his project, define the parameters for his project.
- Linguist: can edit the translation task(s) assigned to him to perform the translation.
Depending on the choice of license type for the CAT tool, the subscription to Calenco Translator options and the choice of roles and management rights of the CAT tool may vary:
Table 1. Calenco Translator Packs according to license type
|
CAT License Type |
Subscription to Calenco Translator |
Necessary roles and rights |
|---|---|---|
|
customer license (Phrase or SmartCat) |
Connector subscription |
Autonomous account management: administrator, project manager and linguist |
|
license (Phrase or SmartCat) of the language service provider (translation agency) |
Connector subscription |
To configure the connector: project manager at least For Client Access: To be checked with the provider as needed |
|
hosting on Calenco's Phrase platform |
Connector subscription + translator license (linguist)[a] |
Project Manager with Restricted Rights linguist |
[a] For any creation, modification or deletion of linguists, please contact your usual Neodoc contact ( | ||
3. Managing a translation project
Each translation request results in a new translation project in the CAT tool.
The project name consists of the following elements: [file label]_[source language code]_[project name]. For example: New Calenco Translator_en_b1bb7c46-cad1-4f9d-adae-31a094280221.
Within each project are sent together:
- The master file;
- the contents included in this document;
- The texts of the SVG illustrations included in this document.
- tasks for each target language if it has several.
![[Important]](cco-important.svg) | Dependencies from another workspace |
|---|---|
Given the user rights specific to each workspace, translation submissions only apply to content from the current workspace. If dependencies are located in other shared workspaces, they will need to be sent separately to translation. |
![[Note]](cco-note.svg) | Translation projects |
|---|---|
If the same document is sent for translation for language 1 and language 2, a single translation project is created for language 1 and language 2. If later the same version of the document is sent in translation for language 3, a new translation project will be created for language 3 in the CAT tool, independently of the first project for language 1 and language 2. |
![[Warning]](cco-warning.svg) | Return of translation to Calenco |
|---|---|
Switching the job to Completed status automatically sends it back to Calenco. For the return of the Smartcat tool files, it takes a few minutes fr the translated content to appear files in the Calenco interface. |
3.1. Track the progress of a translation project in Phrase
To display the general view of a translation project, click on the Project name in the home page. A new page is displayed:
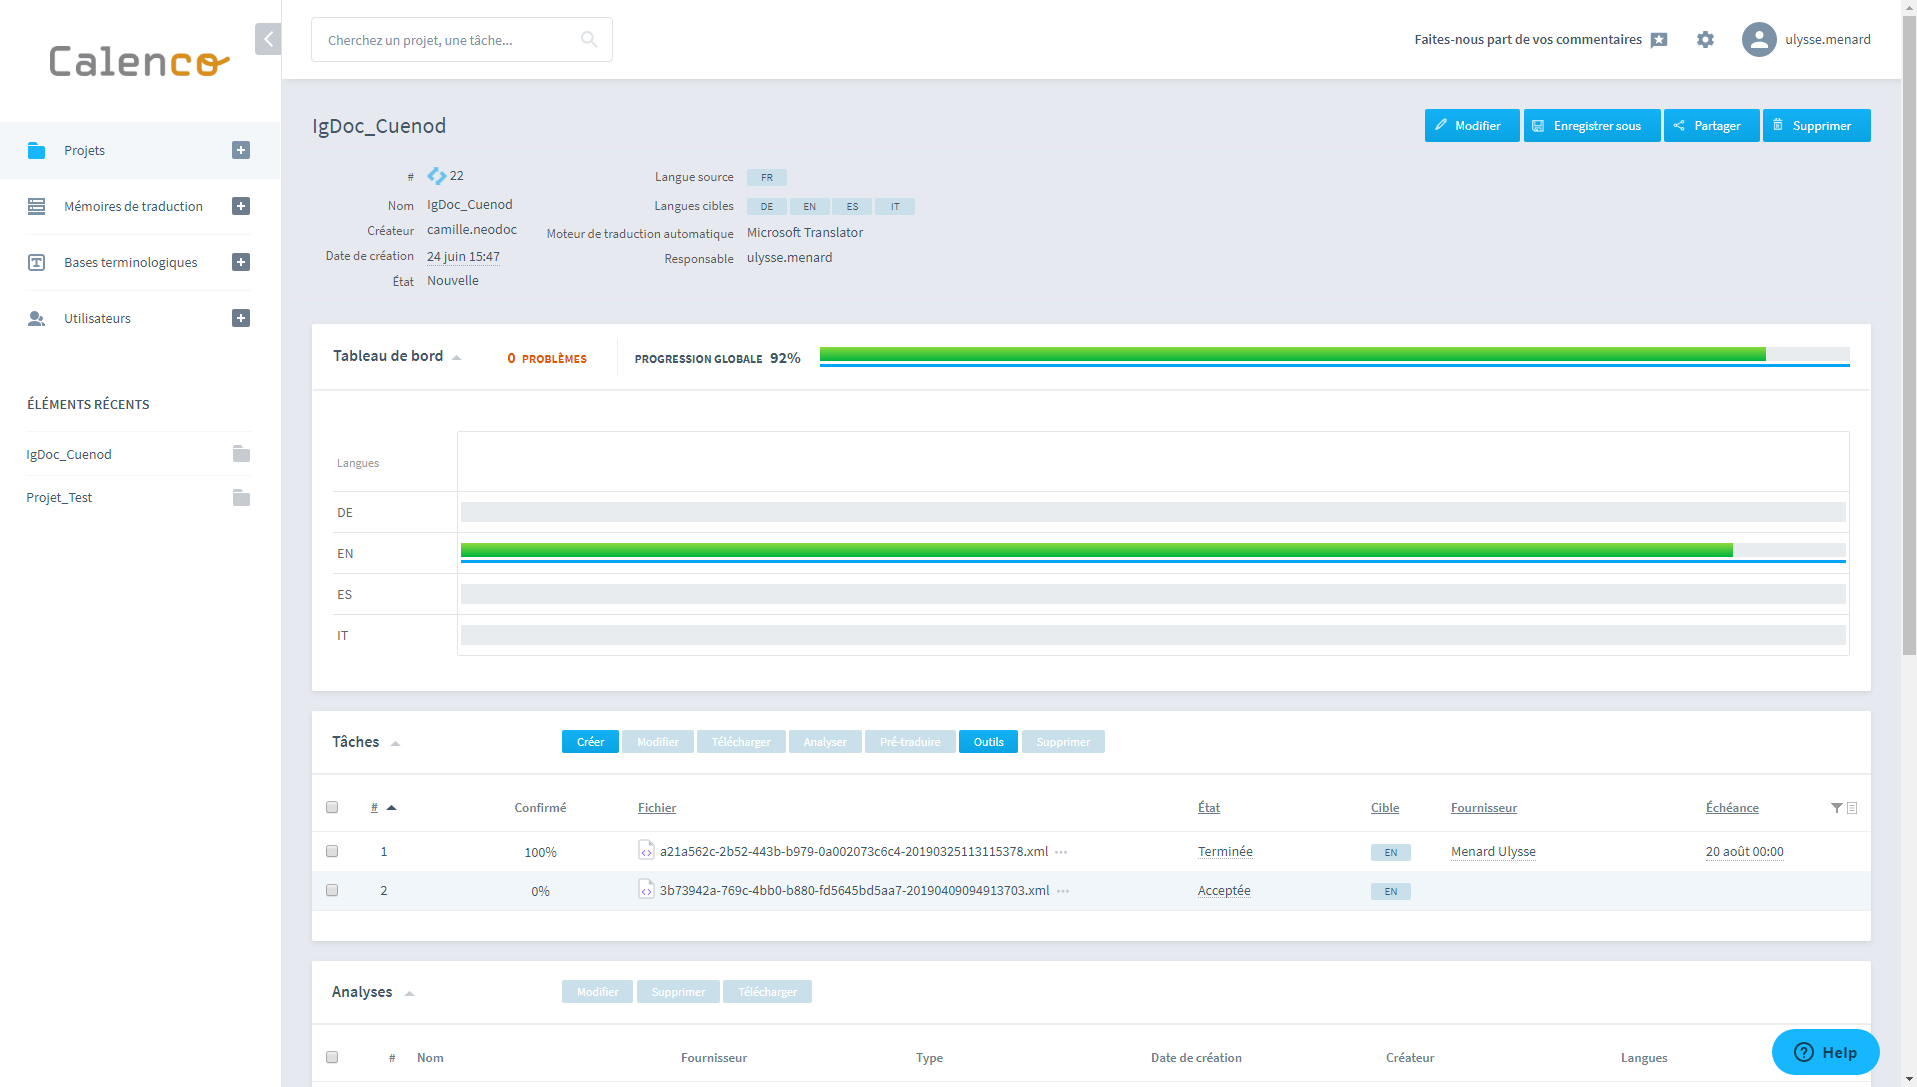
This page is divided into several parts:
- An information banner on the selected translation project;
- A : allows you to see the progress of the tasks to be carried out on the selected translation project, as well as the encountered problems;
- A list of : groups all the translation tasks associated to the project with a percentage of progress for each of them;
- A list of : displays the various analyses performed by Calenco Translator on the selected translation project;
- A list of : allows you to see all the translation memories allocated to the selected translation project (for more information, seeManaging translation memories);
- A list of (for more information, seeManage term bases in Phrase);
- (for more information, see Reference the source document) for this translation project.
| |
The following message is likely to appear for a project that has been inactive for at least 6 months. 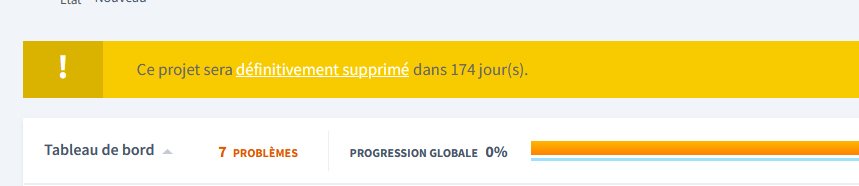 The project will be permanently deleted after 12 months of inactivity. Unless one of the following actions is performed before:
|

4. Perform a translation task in Phrase

| |
Translation tasks will be assigned to you by the translation project manager from Calenco directly. A translation request (cf.To ask for translation) will result in the creation of a task in Calenco Translator. |
4.1. Manage the status of a translation job
Each translation job can have different statuses as the translation project progresses. The status of a job is visible in the Status column. The modification of the status is carried out:
- either via the pencil that appears to the left of the job number when hovering over the job with the cursor;
- or via the icon above the job list (select the job to activate the icon).
The most frequently used statuses in a project are:
- New: job newly created via a translation request from Calenco;
- Accepted: job for which the translator has started work;
Completed: job translated, revised and validated.
Switching the job to Completed status automatically sends it back to Calenco.
The translation job can be validated several times and taken into account on Calenco, in the event that it is necessary to improve the translation of the same version of the document. For the changes to be taken into account on Calenco:
Return the task to the Accepted status.
Make the necessary changes in the editor To edit a translation task.
Validate the task with status Completed.
4.2. To pre-translate a translation task
Select the task to perform by checking the corresponding box in the leftmost column.
Click on to automatically translate segments thanks to the one of the translation memories.
Keep the default settings in the new window that just opened and click on Pre-translate to start the pre-translation.
Following the pre-translation, the percentage of confirmation of the task changes. If not, then you have no translation memory.
If the confirmation percentage has not reached 100%, click on the name of the task in the File column to open the translation task editor.
4.3. To edit a translation task
To open the Translation Editor, click the name of the task in the column File. A new tab is opened:
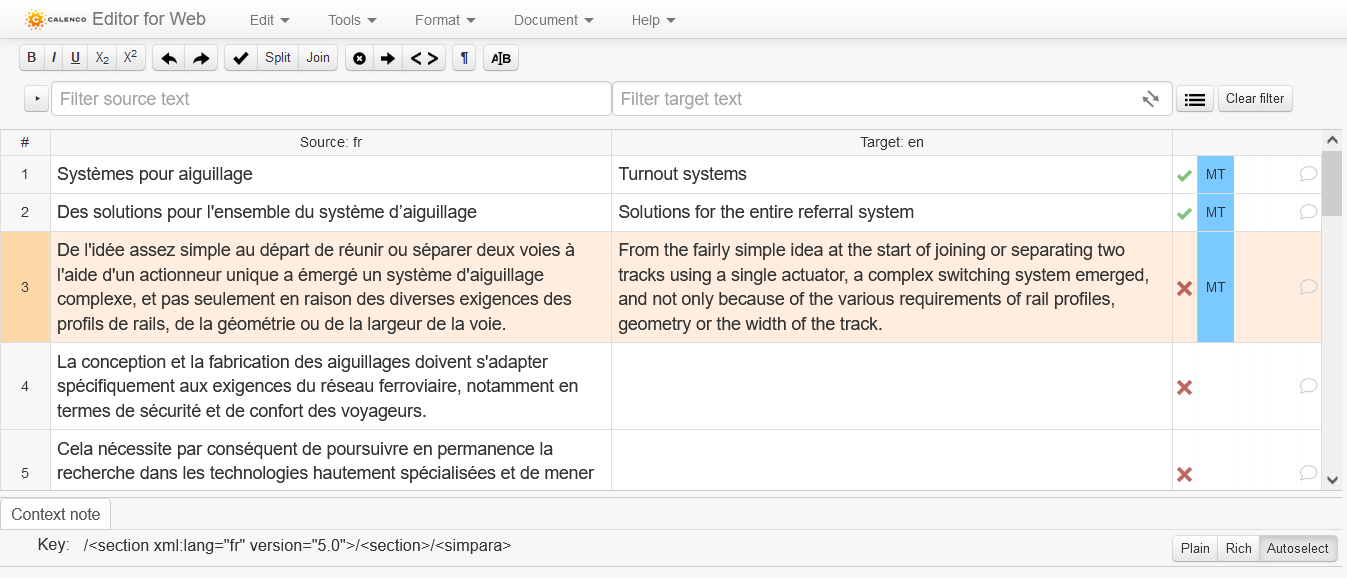
In this window, you will find all of your translation segments in the source language and in the translation language.
| |
If you have performed a pre-translation, the translated segments appear in the column without being validated. |
Validate pre-translated segments
Look at the translation segments that are to be validated, they will be marked with a red cross in the column to the right of the column .
Modify the segments whose translation does not match by editing the fields in the column .
Validate the segments by left clicking on the red cross associated with them; it then turns into a green check mark.
| |
If you do not validate all the segments, the confirmation percentage of the task will not reach 100% and the translations of the non-validated segments will not be sent to your workspace in Calenco. |
4.4. Assess the quality of the translation
Once all the segments are translated and validated with the green tick, it is recommended to carry out quality assurance of the translation, before passing the task to Completed status.
In the menu click on .
A pane opens to the right of the editor interface.
Select items to scan for quality assurance.
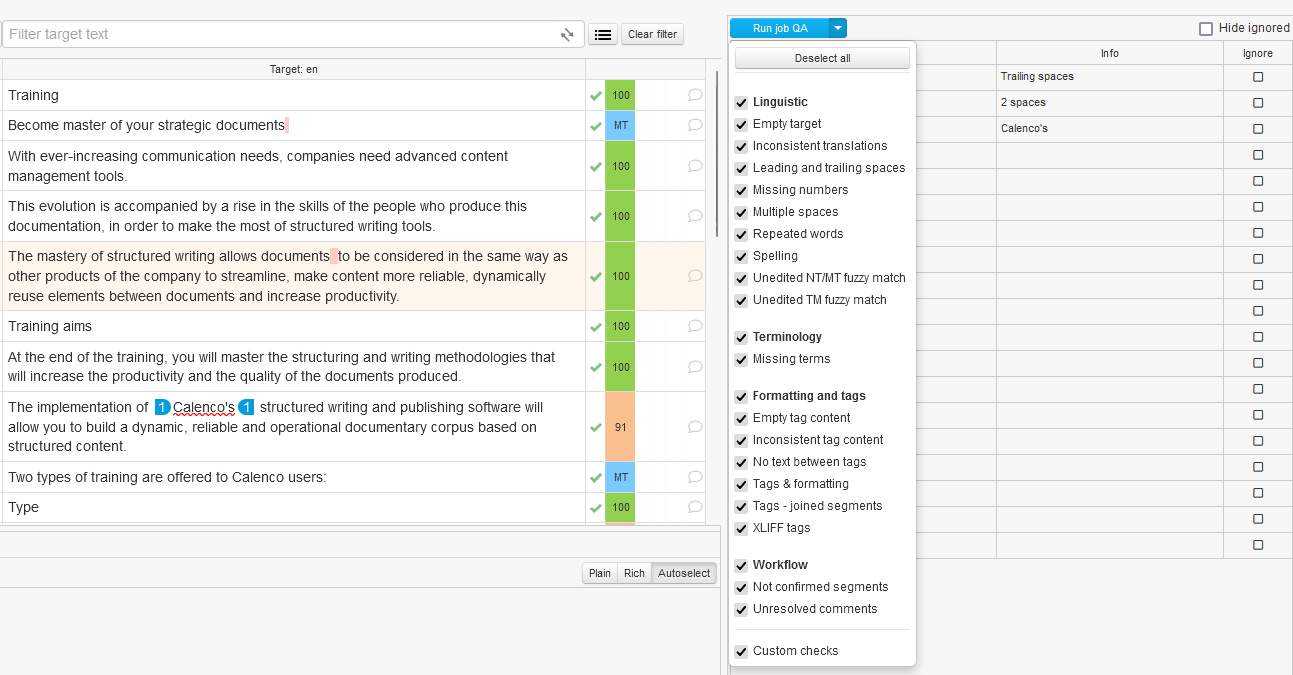
Click to display the results in the pane.
Click on the message to go to the relevant line.
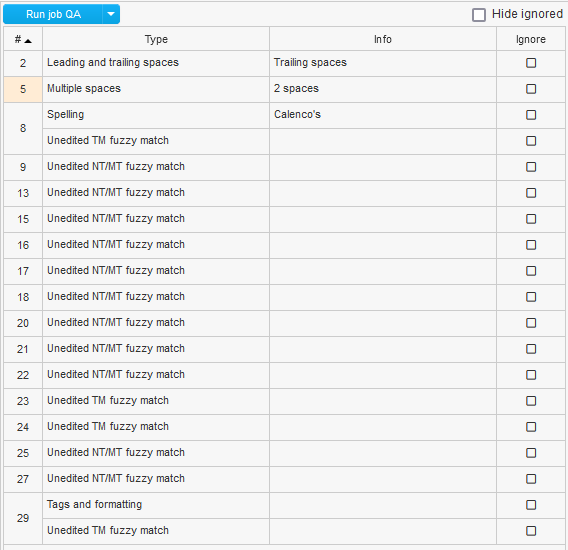
Types of messages and their meaning:
- Leading and trailing spaces: extra space(s) at the start or end of the segment;
- Multiple spaces: extra space(s) between words;
- Spelling: spelling problem;
- Unedited TM (NT/MT) fuzzy match: partial match problem with the translation memory (between the non-translatable element and the translation engine);
Tags and formatting: the number of tags in the target language does not match the number of tags in the source language, or the text is missing between two tags in the target language.

| |
Correcting issues with message “tags and formatting” is essential to ensure translated files are returned to Calenco. |
![[Tip]](cco-tip.svg) | |
Use the Fn+F8 keyboard shortcut to insert a tag. |
4.5. Managing translation memories
If one does not already exist, the translation memory is automatically generated when a new translation is requested.
The new memory is created for the relevant topic in the CAT tool. The memory name is constructed as following: [nom_client] [SOURCE LANGUAGE CODE]. Example: Company AB EN.
The corresponding translation memory in the CAT tool is automatically allocated to the translation project when it arrives from Calenco.
4.5.1. Import or export a translation memory
To import or export a translation memory
Click on the name of the translation memory name to open it.
Click on or , depending on your need.
Fill in the requested fields and set the parameters if necessary then validate again by clicking on or .
4.5.2. Machine translation (MT) engines in Phrase
The Phrase Translate module uses AI to automatically select the optimal MT engine for your translation jobs, based on each job's domain and language pair.
| |
This feature is an additional option. Please contact your usual NeodDoc contact ( |
5. Manage term bases in Phrase
Term bases are libraries of terms that allow you to harmonize the terminology of your documentation.
5.1. Create a term base
To create a new term base, click on the icon in the Term bases part of your project. A new window appears:
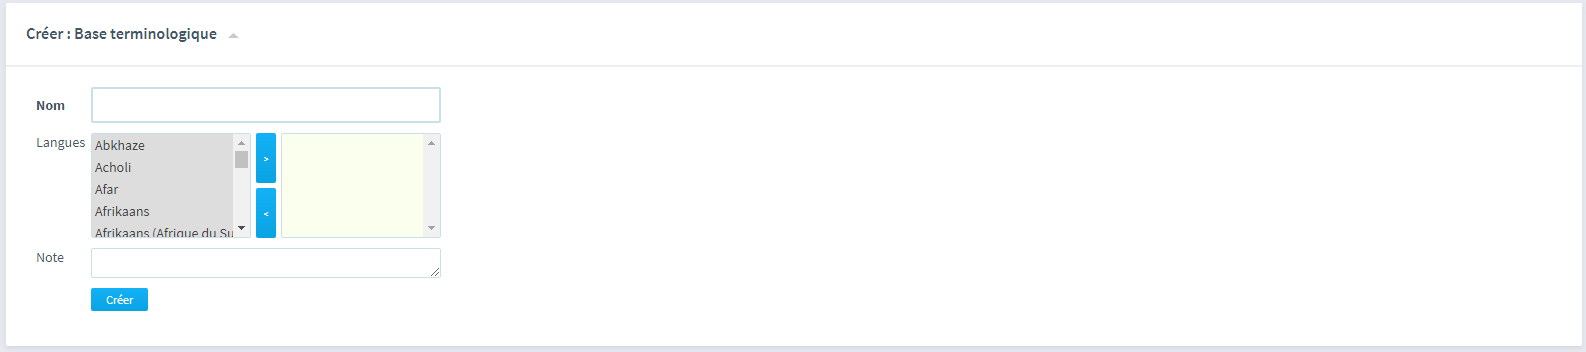
Fill in the empty fields and assign the target languages using the blue arrows. The selected target languages will be displayed in the green field to the right of the blue arrows. Once the parameters are set, click on . The newly created term-base is displayed in the list of term bases.
| |
The fields in bold (Name) are mandatory fields for the creation of a term base. |
5.2. To import or export a term base
To import or export a term base, you must first create a term base (cf.Create a term base). Then follow the following procedure:
Click on the name of the term base to open it.
Click on or , depending on your need.
Fill in the requested fields and set the parameters if necessary then validate again by clicking on or .